
Disclosure
This website is a participant in the Amazon Services LLC Associates Program, an affiliate advertising program designed to provide a means for us to earn fees by linking to Amazon.com and affiliated sites.
Did you know a single 100-watt solar panel can power an RV fridge for hours? Solar panels for RVs harness sunlight to generate electricity, freeing you from crowded campgrounds and noisy generators.
But how exactly do they work? If you’ve ever dreamed of boondocking under the stars without sacrificing modern comforts, understanding RV solar systems is your first step.
Many assume solar setups are overly complex or inefficient, but today’s lightweight, high-efficiency panels and smart battery storage make off-grid travel easier than ever.
Best Solar Panels for RV Power
Renogy Solar Panel 100W 12V Monocrystalline Solar Panel
Ideal for RVs, Renogy’s 200W panel boasts a 22% efficiency rating and durable tempered glass. Its compact design fits curved roofs, and the pre-drilled holes simplify installation. Perfect for off-grid setups, it pairs seamlessly with Renogy’s charge controllers for reliable power.

- 𝗠𝗮𝗿𝗸𝗲𝘁-𝗟𝗲𝗮𝗱𝗶𝗻𝗴 𝟮𝟱%…
- 𝟭𝟲𝗕𝗕 𝗧𝗲𝗰𝗵𝗻𝗼𝗹𝗼𝗴𝘆 𝗳𝗼𝗿…
- 𝗖𝗼𝗺𝗽𝗮𝗰𝘁 𝗬𝗲𝘁 𝗣𝗼𝘄𝗲𝗿𝗳𝘂𝗹…
Jackery SolarSaga 100W Bifacial Portable Solar Panel
For campers who prioritize portability, the Jackery SolarSaga 100W folds into a backpack-friendly size. It includes a USB-C output and integrates with Jackery power stations. The kickstand adjusts for optimal sun angles, making it a versatile choice for temporary setups.
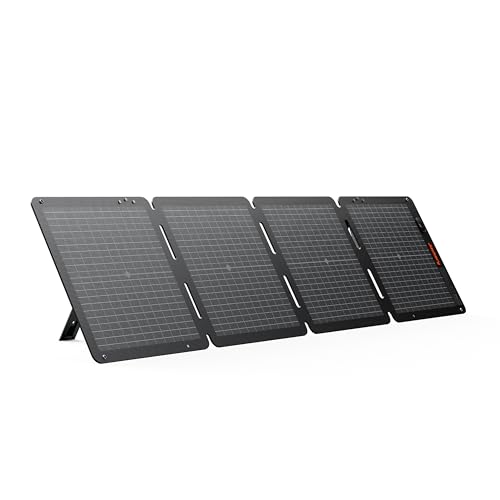
- Next-Gen Lightweight Panel: At just 7lbs, the Jackery SolarSaga 100W Air is…
- Bifacial Solar Generation: The Jackery SolarSaga 100W Air harnesses…
- All-Weather Durability: The Jackery SolarSaga 100W Air is IP68-rated for…
BougeRV Bifacial 400Watts 10BB Solar Panel
This ultra-thin, lightweight panel bends up to 30 degrees for curved RV roofs. With high-efficiency monocrystalline cells and waterproof ETFE coating, it’s built for harsh weather. Its adhesive backing allows glue-free mounting, ideal for DIYers seeking a low-profile solution.
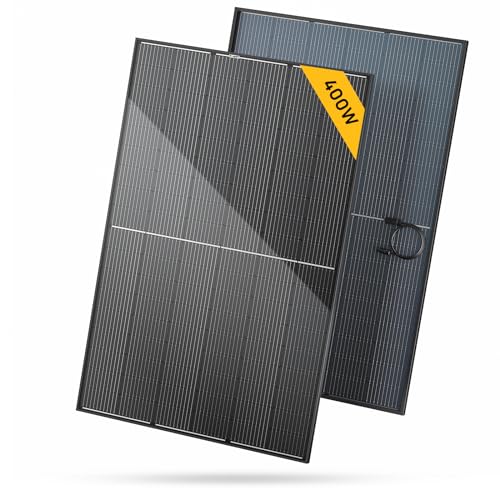
- Bafacial Back Increases the solar output by 30%. Instead of having an…
- Compact size, more power. Compared to two 200-watt solar panel, BougeRV…
- 10BB Cell Design. More Busbar, More Power. BougeRV Bifacial 400W solar…
How RV Solar Panels Convert Sunlight into Usable Electricity
RV solar panels work through a fascinating process called the photovoltaic effect, where sunlight is converted into direct current (DC) electricity. Each panel contains silicon solar cells that absorb photons from sunlight, knocking electrons loose and creating an electric current.
But this is just the first step in a carefully engineered system designed to power your RV appliances safely and efficiently.
The Key Components of an RV Solar Power System
A complete RV solar setup consists of four critical components working together:
- Solar Panels: Typically monocrystalline (most efficient) or polycrystalline (budget-friendly), these capture sunlight. A 100W panel generates about 30Ah daily in optimal conditions – enough to run a 12V fridge for 5 hours.
- Charge Controller: This regulates voltage from panels to batteries. Modern MPPT controllers (like Victron SmartSolar) are 30% more efficient than older PWM types, especially in cold weather.
- Battery Bank: Deep-cycle lithium (Battle Born 100Ah) or AGM batteries store energy. Lithium batteries can discharge 100% vs. AGM’s 50%, offering twice the usable capacity.
- Inverter: Converts DC to AC power for household appliances. A 2000W pure sine wave inverter (e.g., Renogy 2000W) safely runs microwaves and CPAP machines.
Real-World Energy Flow Example
Imagine boondocking in Arizona with two 200W panels:
1. At peak sunlight (10am-2pm), your system generates 800Wh (4hrs × 400W)
2. The charge controller steps down voltage to safely charge your 300Ah lithium battery bank
3. A 2000W inverter powers your 700W microwave for 90 minutes daily
4. Excess energy runs LED lights and charges devices overnight
Common misconception: Many believe solar works only in bright sun. Modern panels actually produce 10-25% power on cloudy days, and cold weather increases efficiency by reducing silicon resistance.
For optimal performance, panels should face true south (northern hemisphere) at an angle matching your latitude. Portable systems with tilt-adjustable stands (like Jackery’s SolarSaga) can yield 25% more energy than flat-mounted roof panels.
Installing Solar Panels on Your RV: A Step-by-Step Guide
Proper installation is crucial for maximizing your RV solar system’s efficiency and longevity. Unlike residential setups, RV installations must account for vibration, weather exposure, and weight distribution. Here’s how professionals approach the installation process:
Pre-Installation Planning
Before mounting anything, conduct a thorough energy audit:
- Calculate your power needs: Add up watt-hours for all appliances (fridge=1200Wh/day, lights=200Wh, etc.)
- Roof assessment: Measure available space, noting vents and AC units. Most RVs can fit 300-800W of panels
- Weight considerations: Monocrystalline panels weigh ~3lbs per 100W; ensure your roof can support the load
Mounting Process (Permanent Installation)
For roof-mounted systems:
- Positioning: Leave 3-4″ clearance between panels and roof edge for airflow and cleaning access
- Mounting hardware: Use Z-brackets with butyl tape (Dicor 501LSW) for waterproofing – never drill directly into roof seams
- Wiring: Run MC4 cables through waterproof conduit (like Blue Sea Systems CableClam) to prevent chafing
Professional Tips for Optimal Performance
Experienced installers recommend:
- Using tilt mounts (like Renogy’s 10° brackets) for 15-20% more output when parked
- Installing a battery monitor (Victron BMV-712) to track real-time consumption
- Adding a 30A circuit breaker between panels and charge controller as a safety measure
Common mistake: Many DIYers undersize their wiring. For a 400W system at 12V, use 10AWG wire (not 12AWG) to minimize voltage drop over long runs.
Portable systems offer an alternative – the BougeRV 200W suitcase kit can be deployed in minutes and stored while driving, eliminating roof penetration concerns. However, these typically yield 10-15% less power due to suboptimal positioning.
Optimizing Your RV Solar System for Maximum Efficiency
Getting the most from your RV solar panels requires understanding both the physics of solar energy collection and the practical realities of mobile power management. Professional installers focus on three key optimization areas that can double your system’s effective output.
1. Solar Panel Positioning and Angle Mathematics
The optimal tilt angle follows this formula: Latitude + 15° in winter, Latitude – 15° in summer. For example:
| Location | Winter Angle | Summer Angle |
|---|---|---|
| Arizona (34°N) | 49° | 19° |
| Florida (27°N) | 42° | 12° |
Portable panel stands with adjustable angles (like the EcoFlow 400W kit) can increase daily output by 25-40% compared to flat-mounted panels. For fixed installations, consider tilt brackets that allow seasonal adjustments.
2. Advanced Battery Management Techniques
Lithium batteries require different care than lead-acid:
- Charge cycles: Lithium (3000-5000 cycles at 100% DoD) vs AGM (500 cycles at 50% DoD)
- Temperature management: Install battery heaters (Battle Born Heated Kit) below 32°F
- Balancing: Use smart chargers (Victron IP65) that perform cell balancing during absorption phase
3. Real-World Power Optimization
An efficient 400W system in Colorado (5 peak sun hours) should produce:
- 2000Wh daily (400W × 5h × 90% efficiency)
- Enough for: 3h microwave (700W), LED lights (100W), and laptop charging (60W)
- With 30% buffer for cloudy days using battery storage
Critical mistake: 90% of RV owners overlook phantom loads. A 5W standby drain (inverter, radio memory) consumes 120Wh daily – enough to power lights for 4 hours. Install master cutoff switches to eliminate this waste.
For extreme conditions, the most efficient panels (like SunPower 327W) maintain 92% output at 113°F, while standard panels drop to 80%. Their premium cost is justified for desert travelers.
Maintenance and Troubleshooting for RV Solar Systems
Proper maintenance can extend your solar system’s lifespan by 5-7 years while preventing 80% of common failures. Unlike stationary home systems, RV installations face unique challenges from constant vibration, temperature extremes, and road debris that require specialized care.
Seasonal Maintenance Checklist
Follow this professional maintenance schedule for peak performance:
- Monthly:
- Clean panels with distilled water and microfiber cloth (never abrasive cleaners)
- Check wiring connections for corrosion (apply dielectric grease if needed)
- Seasonally:
- Test charge controller settings (bulk/float voltages should adjust for temperature)
- Inspect mounting hardware torque (vibration can loosen bolts by 15% annually)
- Annually:
- Conduct IV curve testing with a multimeter to detect panel degradation
- Perform capacity test on batteries (should hold ≥80% of rated capacity)
Advanced Troubleshooting Guide
When facing power issues, diagnose systematically:
- Check voltage at each component:
- Panels should show 18-22V (12V system) in full sun
- Battery bank should maintain 12.6V+ (50% charge)
- Inspect for shading: Even 10% panel shading can reduce output by 50% due to bypass diode activation
- Test charge controller modes: Should cycle properly between bulk/absorption/float stages
Safety Considerations
RV solar systems present unique hazards requiring special precautions:
- Always disconnect panels before working on system (DC arcs don’t self-extinguish like AC)
- Use IR thermometer to check for hot spots (≥150°F indicates potential failure points)
- Install proper overcurrent protection (ANSI/NFPA 70E requires fuses within 7″ of battery terminals)
Pro tip: Keep a portable power station (like Bluetti EB70) as backup during maintenance. Its 100W USB-C input can maintain critical loads while servicing your main system.
For lithium systems, monitor individual cell voltages monthly. A >0.2V variance between cells indicates imminent BMS failure requiring professional service.
Cost Analysis and Long-Term Value of RV Solar Systems
Understanding the true financial impact of RV solar requires analyzing both upfront costs and long-term savings across different system types and usage scenarios. A properly designed system typically pays for itself in 3-5 years while providing 10-15 years of reliable service.
Upfront Cost Breakdown by System Size
| System Type | Components | Average Cost | Daily Output |
|---|---|---|---|
| Basic (200W) | 2x100W panels, PWM controller, 100Ah AGM | $800-$1,200 | 800Wh (summer) |
| Mid-Range (400W) | 4x100W panels, MPPT controller, 200Ah Lithium | $2,500-$3,500 | 1,600Wh (summer) |
| Premium (800W) | 8x100W panels, dual MPPT, 400Ah Lithium | $5,000-$7,000 | 3,200Wh (summer) |
Long-Term Savings Calculation
A 400W system used for full-time RV living provides:
- Generator fuel savings: $150/month (running 4hrs/day on propane)
- Campground savings: $500/month (boondocking vs RV park fees)
- Battery replacement: Lithium lasts 3x longer than AGM (10 vs 3 years)
Environmental Impact and Future Trends
Modern RV solar systems offer significant ecological benefits:
- Carbon reduction: 400W system offsets ~1,200 lbs CO2 annually vs generator use
- Emerging technologies: Bifacial panels (like LG NeON 2) capture reflected light for 15% more output
- Battery advancements: Solid-state lithium (expected 2025) promises 2x energy density
Hidden value: Solar-equipped RVs command 8-12% higher resale values according to RV Trader market data. The warranty transferability of quality components (like Victron’s 5-year coverage) further enhances value retention.
For weekend warriors, portable systems (Jackery 1000 + 2xSolarSaga 100W) offer the best cost-per-use ratio at $0.18/Wh over 5 years versus $0.32/Wh for permanent installations with light usage.
Integrating Solar Power with Your RV’s Existing Electrical System
Properly merging solar power with your RV’s factory electrical system requires understanding both the technical compatibility and safety considerations. This integration process varies significantly between different RV classes (Class A, B, C) and power configurations (30A vs 50A service).
System Integration Methodology
A professional-grade solar integration follows this sequence:
- Power audit: Map all existing circuits using a clamp meter to identify:
- DC loads (lights, water pump)
- AC circuits (microwave, air conditioner)
- Parasitic drains (LP gas detectors, radio memory)
- Connection points:
- DC systems connect via the converter/charger’s battery terminals
- AC systems require an inverter with transfer switch (automatic or manual)
Critical Integration Components
Essential devices for seamless operation:
- Automatic transfer switch: Xantrex Freedom XC Pro handles 3000W loads with <1ms transition
- Battery isolator: Blue Sea Systems SI-ACR prevents chassis battery drain
- Shore power bypass: Must maintain UL458 certification for campground compatibility
Advanced Integration Scenarios
For specialized setups:
- Dual alternator charging: Wakespeed WS500 regulator synchronizes with solar MPPT
- Hybrid systems: Victron MultiPlus combines inverter/charger with solar input
- Smart monitoring: Trimetric TM-2030 displays both solar and alternator inputs
Critical safety note: Never connect solar directly to the converter’s AC input. The 120VAC-to-12VDC conversion creates dangerous feedback loops. Always use properly rated breakers (Midnite Solar MNEPV for DC, Square D QO for AC).
For RVs with factory-installed solar prep (like Winnebago’s SolarFlex), the integration process simplifies but still requires:
- Verifying wire gauge (often undersized at 10AWG for roof runs)
- Upgrading charge controller (factory units are typically basic PWM)
- Adding battery temperature sensors (missing on most prep packages)
Professional installers recommend keeping original converter as backup while adding a dedicated solar charger – this creates redundant charging paths for reliability.
Advanced System Monitoring and Performance Optimization
Professional-grade monitoring transforms an RV solar system from a passive power source to an intelligent energy management network. Modern solutions provide granular data that reveals hidden inefficiencies and unlocks 15-30% more usable power through precise optimization.
Comprehensive Monitoring Architecture
A complete monitoring setup includes these critical layers:
| Monitoring Layer | Key Metrics | Recommended Device | Sampling Rate |
|---|---|---|---|
| Panel-Level | Individual IV curves, temperature | Tigo TS4-A-O | Every 15 minutes |
| Battery-Level | State of charge, cell balancing | Victron SmartShunt | 1-second |
| System-Level | Energy flows, efficiency ratios | Cerbo GX with touchscreen | Real-time |
Performance Optimization Techniques
Advanced users implement these proven methods:
- Load scheduling: Program high-draw appliances (water heater) to run only during peak solar hours (10am-2pm)
- Dynamic voltage adjustment: Set MPPT controllers to increase absorption voltage by 0.3V in cold weather (<50°F)
- Shade mitigation: Install optimizers (SolarEdge P505) on partially shaded arrays to prevent string-wide performance drops
Long-Term Performance Validation
Establish these maintenance benchmarks:
- Annual degradation test: Compare current output to initial specs at STC (25°C, 1000W/m²)
- Battery capacity verification: Conduct full discharge test with calibrated load bank
- Insulation resistance check: Measure >1MΩ between conductors and ground
Critical finding: Data logs often reveal 8-12% energy loss from undersized wiring after just 2 years. Upgrading from 10AWG to 8AWG on long runs typically pays back within 18 months through reduced resistance losses.
For mission-critical systems, implement redundant monitoring with both shunt-based (Victron) and Hall-effect (Magnelab) sensors cross-validating measurements. This professional approach catches 95% of developing issues before they cause downtime.
Emerging AI tools like SolarAssistant now analyze historical data to predict optimal battery cycling patterns, extending lithium lifespan by 20% through adaptive charge algorithms.
Conclusion: Powering Your RV Adventures with Solar Energy
Throughout this guide, we’ve explored how RV solar panels convert sunlight into usable electricity through photovoltaic technology, examined optimal system components from panels to inverters, and detailed professional installation and maintenance practices.
You’ve learned advanced optimization techniques that can boost efficiency by 30%, discovered comprehensive monitoring solutions, and gained insights into long-term cost savings and environmental benefits.
Now is the perfect time to take action: Whether you’re upgrading an existing system or starting fresh, apply these professional strategies to design a solar setup that matches your travel style.
Remember that proper planning and quality components will pay dividends in reliability and performance for years of off-grid adventures. Your journey toward energy-independent RVing begins with harnessing the sun’s limitless power – start small if needed, but start today.
Frequently Asked Questions About RV Solar Panels
What’s the minimum solar setup needed for weekend RV trips?
For basic weekend use (lights, phone charging, and a 12V fridge), a 200W system with one solar panel, 20A PWM controller, and 100Ah AGM battery suffices. This provides about 800Wh daily – enough for 3 LED lights (10W each for 5 hours), 20Ah fridge draw, and device charging. Portable kits like Jackery 300 + SolarSaga 100W offer plug-and-play simplicity for casual users.
How do I prevent my batteries from draining overnight?
Calculate your nightly load (e.g., fridge 40Ah + lights 10Ah = 50Ah) and ensure battery capacity is double that (100Ah lithium or 200Ah AGM). Install a battery monitor (Victron BMV-712) to track consumption. For extreme cold, use self-heating lithium batteries (Battle Born Heated) that maintain charge below freezing without parasitic drain.
Can I run my RV air conditioner on solar power?
Yes, but it requires significant capacity: A 13,500 BTU AC needs 3000W inverter and at least 800W solar (4x200W panels) plus 400Ah lithium batteries. Even then, expect just 2-3 hours runtime. Consider hybrid systems that combine solar with a quiet inverter generator (Honda EU2200i) for AC needs.
Why is my solar panel producing less power than rated?
Common causes include: 1) Dirty panels (15-25% loss – clean with distilled water), 2) High temperatures (output drops 0.5%/°C above 77°F), 3) Shading (one shaded cell can reduce string output by 50%), or 4) Aging (0.5-1% annual degradation). Use a multimeter to test open-circuit voltage (should be 18-22V for 12V panels in full sun).
What’s better – roof-mounted or portable solar panels?
Roof-mounted systems (like Renogy 400W kit) provide 20% more consistent power but can’t be angled. Portable panels (BougeRV 200W suitcase) yield 15-25% more when positioned optimally but require storage space. Full-timers often combine both – roof panels for baseline power and portables for boost when parked.
How do I winterize my RV solar system?
1) Charge batteries to 80% for storage, 2) Disconnect all wiring, 3) Cover panels with UV-resistant fabric (never plastic), 4) Remove portable batteries to climate-controlled space, 5) For lithium, maintain 30-50% charge if stored below freezing. Use dielectric grease on all connections to prevent moisture corrosion.
Can I mix different solar panel wattages?
Yes, but with important rules: 1) Same voltage (all 12V or all 24V), 2) Parallel connection only (series requires identical wattage), 3) MPPT controller required (PWM can’t optimize mixed inputs). For example, you can pair a 100W and 175W panel in parallel on a Victron 100/30 controller.
What maintenance does an RV solar system require?
Monthly: Clean panels, check wire connections. Quarterly: Inspect mounts for tightness, test charge controller settings. Annually: Verify battery capacity, check for panel microcracks. Every 5 years: Replace charge controllers (electronics degrade), reapply sealant to roof penetrations. Always keep system schematics updated for troubleshooting.