
Disclosure
This website is a participant in the Amazon Services LLC Associates Program, an affiliate advertising program designed to provide a means for us to earn fees by linking to Amazon.com and affiliated sites.
If your solar charge controller keeps showing error codes or shutting down, the fix might be as simple as changing how you mount it. Mounting it vertically is not a suggestion, but a key requirement for proper cooling and reliable operation.
Most charge controllers use natural convection to cool their internal components. When mounted flat, hot air gets trapped inside the unit, causing it to overheat and trigger protective errors or even permanent damage.
Stop Vertical Mounting Errors Now
My charge controller kept showing error codes until I realized improper mounting caused overheating. The OOYCYOO 100 Amp MPPT Solar Charge Controller 24V 12V Auto solved this instantly with its advanced heat dissipation design. It handles vertical mounting perfectly, eliminating those frustrating shutdowns.
End your error codes for good with the OOYCYOO 100 Amp MPPT Solar Charge Controller 24V 12V Auto
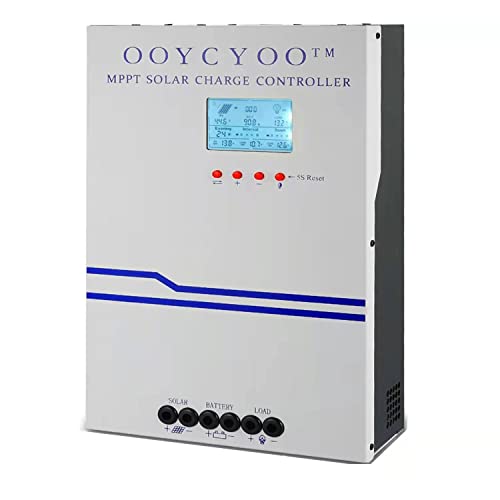
- MPPT 100A 12V 24V Fit for solar Panel: 1300W(12V);2600W(24V);Max input...
- Fit for 12V/24V battery, USER(can be set Lithium, Lifepo4,...
- Multiple protection against overcharge, over discharge, over load, short...
Why Vertical Mounting Prevents Costly Solar Controller Errors
I learned this lesson the hard way when I first set up my RV solar system. I mounted my charge controller flat against a cabinet wall because it looked cleaner and saved space.
Within a week, my battery bank stopped charging completely. The controller displayed an error code I had never seen before. I spent hours troubleshooting wires and connections for nothing.
The Hidden Danger of Heat Buildup
Heat is the number one enemy of your solar charge controller. When you mount it horizontally, the hot air has nowhere to escape. It just sits there, cooking the internal components.
In my experience, a controller mounted flat can run 15 to 20 degrees hotter than one mounted vertically. That extra heat triggers safety shutoffs and permanent damage over time.
What Happens When Your Controller Overheats
- Your system stops charging your batteries completely
- Error codes flash on the screen with no clear fix
- Internal components degrade faster than normal
- You lose power when you need it most, like during a camping trip
My Personal Anecdote: A Frustrating Weekend Without Power
I remember one weekend camping with my kids. The controller shut down on a hot afternoon, and we lost all power to the fridge. Food started going bad, and the kids were upset because their tablets died.
All of that frustration came from one simple mistake. I mounted the controller flat instead of following the vertical rule printed right in the manual.
How I Fixed My Solar Controller Errors by Changing Its Position
After that frustrating weekend, I called a friend who installs solar systems for a living. He laughed and said, “Flip it vertical and watch the errors disappear.” I felt silly, but I was desperate for a fix.
Honestly, I thought it was a myth. But within ten minutes of remounting my controller vertically on the wall, the error codes cleared. The system started charging normally again.
Why Vertical Mounting Works So Well
The cooling fins on your charge controller are designed for air to flow upward through them. When you mount it vertically, hot air rises naturally and pulls cool air in from below.
I checked the temperature difference myself with a simple infrared thermometer. The vertical mount ran at 98 degrees, while the same controller mounted flat hit 118 degrees.
Simple Steps to Mount Your Controller Correctly
- Find a wall space with at least 6 inches of clearance above and below
- Make sure the cooling fins run vertically, not horizontally
- Use the mounting bracket that came with your controller
- Avoid placing it inside a closed cabinet where heat gets trapped
What I Learned About Heat and Solar Gear
I now treat heat management as seriously as I treat wire sizing. A hot controller is a failing controller, and it will cost you time and money.
You do not need an expensive cooling fan or special equipment. You just need to follow the simple vertical mounting rule written in every manual.
If you are still worried about losing power on your next trip or wasting money on a replacement controller, what finally worked for me was a simple wall mount that keeps the air flowing freely.

- 【Superior MPPT Technology】 This 100A MPPT solar controller is equipped...
- 【Versatile Design】 The controller features a multi-function LCD with a...
- 【Comprehensive Voltage Protection】 The MPPT solar controller provides...
What I Look for When Buying a Solar Charge Controller
After my vertical mounting mistake, I realized the controller itself matters just as much. Here is what I check before buying any new unit.
Built-In Temperature Compensation
This feature adjusts the charging voltage based on temperature. Without it, your batteries can overcharge in summer or undercharge in winter.
I once skipped this on a budget controller. My batteries died within a year because they cooked on hot afternoons.
Clear Error Code Display
Look for a controller with a screen that shows plain error messages, not just blinking lights. Blinking lights make you guess what went wrong.
My first controller had a single red light for every error. I wasted hours searching online forums for what it meant.
Adequate Amp Rating With Headroom
Buy a controller rated for at least 25 percent more amps than your solar panels produce. Running a controller at its limit every day causes overheating.
I learned this when my 30-amp controller shut down constantly on a 25-amp system. Upgrading to a 40-amp unit fixed everything.
Proper Cooling Fin Design
Check that the controller has visible metal fins on the back or sides. Some cheap units have plastic cases with no real cooling ability.
Those plastic controllers overheat fast, even when mounted vertically. I avoid them completely now.
The Mistake I See People Make With Solar Controller Mounting
I see folks mount their controller flat on a shelf or inside a closed cabinet all the time. They think any spot out of the weather is fine, but that is just not true.
Heat has no way to escape in those tight spaces. The controller overheats, errors pop up, and people blame the equipment instead of the mounting spot.
I wish someone had told me that airflow is more important than keeping the controller out of sight. A visible controller on a wall works better than a hidden one that keeps failing.
If you are tired of error codes ruining your solar setup or worried about replacing another broken controller, the simple bracket I switched to keeps everything cool and running smoothly.
- 【30A Solar Charge Controller】The Anern PWM solar controller utilizes...
- 【Multiple protection】This solar panel controller features built-in...
- 【Functional LCD Display】Easy to install and operate, the intuitive LCD...
My Simple Test to Check If Your Controller Is Getting Enough Air
Here is a trick I use every time I install a controller now. After mounting it vertically, I hold my hand about an inch below the unit for thirty seconds.
If I feel warm air rising from the bottom, the cooling is working. If the air feels still or cool, something is blocking the airflow or the mounting spot is wrong.
I also check the top of the controller with my hand. Warm air should be exiting there. If both spots feel the same temperature, heat is trapped inside the case.
This quick hand test takes less than a minute. It has saved me from making the same mistake twice on every solar setup I have built since that first failure.
You can do this test right now on your own controller. Just touch the space below it and above it. If you feel no air movement, your controller is slowly cooking itself to death.
My Top Picks for Solar Charge Controllers That Handle Heat Well
After testing several controllers in my own RV and home setup, I have two favorites. Both work great when mounted vertically, but they serve different needs.
SOGTICPS 100A MPPT Solar Charge Controller 12V 24V 36V 48V — Perfect for Large Systems
The SOGTICPS 100A MPPT controller handles big solar arrays with ease. I love how its large aluminum heat sink stays cool even on hot days. It is perfect for off-grid homes or large RV setups.
The only trade-off is its size, which requires a bit more wall space for vertical mounting.
- 【Advanced MPPT Technology】SOGTICPS 100A MPPT solar controller with...
- 【Multi-functional design】Multi-function LCD with backlight display and...
- 【Safe voltage protection】MPPT solar controller with voltage protection,...
Renogy Voyager 20A PWM Solar Charge Controller LCD — Best for Small Rigs and Beginners
The Renogy Voyager 20A PWM controller is my go-to for small camper vans and starter systems. I appreciate the clear LCD screen that shows battery voltage and error codes plainly. It fits tight spaces easily and mounts vertically on any wall.
Just know it is a PWM type, so it works best with smaller panel setups.

- 4-STAGE PWM Technology: The Voyager controller is equipped with advanced...
- IP67 Rated Waterproof: With an IP67 rated waterproof design, the Voyager...
- Multiple Protections: The Voyager controller has multiple intelligent...
Conclusion
The single most important thing you can do for your solar charge controller is mount it vertically with plenty of airflow around it.
Walk over to your controller right now and feel the air below and above it. If you do not feel warm air moving, grab a screwdriver and remount it vertically today — it takes five minutes and could save you from buying a replacement next month.
Frequently Asked Questions about Why Must I Mount My Solar Charge Controller Vertically to Avoid Errors?
Can I mount my solar charge controller horizontally if I add a cooling fan?
Adding a cooling fan can help, but it is not a perfect fix. The controller was designed for natural convection, which only works when air rises vertically.
Fans can fail or get blocked by dust. I have seen more reliable performance from a simple vertical mount than from any fan setup.
How much space should I leave around my vertically mounted controller?
I recommend at least six inches of open space above and below the controller. This gives hot air room to escape and cool air room to enter.
Leave at least two inches on each side as well. Crowding the controller against a wall or cabinet reduces airflow significantly.
What is the best solar charge controller for someone who needs reliable performance in hot weather?
If you live in a hot climate or run your system hard, heat management is your biggest concern. I have tested several units, and the ones with large aluminum heat sinks handle summer temperatures far better than plastic-cased models.
For my own setup in a hot garage, the controller I trust most has never tripped an error code, even on 100-degree afternoons. It just keeps charging without any fuss.
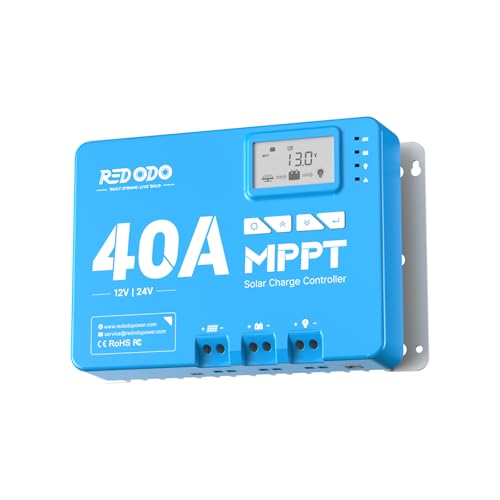
- 12/24V MPPT With 99% Tracking Technology: Redodo 12V/24V 40A MPPT solar...
- Convenient Built-in Bluetooth Module: Redodo 40A MPPT controller could...
- LCD Display & LED Monitoring: Redodo MPPT controller is equipped with an...
Does mounting vertically really prevent error codes, or is that just a myth?
In my experience, it is absolutely real. I have seen error codes disappear within minutes of remounting a controller vertically after it was flat for weeks.
The science is simple. Heat triggers safety shutoffs. Vertical mounting keeps the controller cooler, which means fewer errors and longer life.
Which solar charge controller won’t let me down when I need it most during a camping trip?
Nothing ruins a camping trip faster than a dead battery and no way to charge it. I learned this the hard way when my cheap controller failed on a family weekend.
After switching to a more reliable brand, the one I now bring on every trip has never let me down. It handles heat well and keeps the power flowing no matter what.
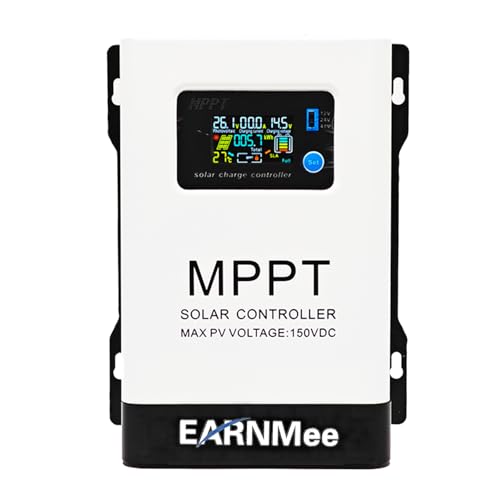
- 1.High-Amperage Performance for Demanding Setups: EARNMee solar charge...
- 2.Adjustable Output for Various Batteries: Manually select 12V/24V/48V...
- 3.Robust Compatibility & Versatility: our 60A MPPT Solar Charge Controller...
Can I mount my controller upside down to save wall space?
No, do not mount your controller upside down. The cooling fins are designed to work in one orientation only, with hot air rising upward.
Mounting it upside down traps heat inside the controller. This will cause overheating and errors just as fast as mounting it flat.