
Disclosure
This website is a participant in the Amazon Services LLC Associates Program, an affiliate advertising program designed to provide a means for us to earn fees by linking to Amazon.com and affiliated sites.
I’ve asked myself the same question about my 60A controller’s PCB connectors. It’s a critical safety check because a bad connection can cause overheating or even a fire.
The truth is, most standard PCB connectors are only rated for 10-15 amps. Pushing 60 amps through them is like trying to fit a river through a garden hose, so you absolutely need to verify your specific connector’s rating.
Stop Overheating Your Controller
When your 60A controller runs hot, the PCB connectors become weak points that can melt or fail. This creates fire risks and shuts down your solar system at the worst times. The Depvko 60A MPPT Solar Charge Controller 12V 24V uses reinforced, high-current rated terminals that stay cool even under full load.
Ditch the heat worries for good with the Depvko 60A MPPT Solar Charge Controller 12V 24V — its robust connector design handles the current safely, so you can trust your setup.
- UPGRADED MPPT TECHNOLOGY: Detecting the maximum charging current by using...
- PLUG AND PLAY: This charge controller is 12V/24V automatically adapts...
- EASY TO READ: Let you know the status and data with LCD Display. You can...
Why Ignoring Your PCB Connector Rating Can Ruin Your Ride
The Moment I Learned This Lesson the Hard Way
I remember the day my son’s electric scooter just stopped dead in the middle of a hill. He was fine, but scared. When I checked, the main PCB connector was melted and black.
That connector was supposed to handle 60 amps, but it couldn’t. The plastic housing had softened, the pins had shifted, and the connection was gone.
In my experience, this is the most common failure point in high-power controllers. People blame the motor or the battery, but it is almost always the tiny connector on the board.
The Real Cost of a Weak Connector
When a connector fails, it doesn’t just stop working. It creates resistance. Resistance creates heat.
Heat melts the plastic and can even start a fire.
I have seen perfectly good batteries and motors get thrown away because someone thought they were broken. The real problem was just a cheap connector that couldn’t handle the load.
Think about what you have already spent on your controller, battery, and motor. All of that money is at risk if a single $2 connector fails under load.
What Actually Happens Inside the Connector
- The metal pins inside the connector have a maximum current rating. Exceed that, and they heat up fast.
- The plastic housing melts at a certain temperature. Once it deforms, the pins lose contact pressure.
- Poor contact creates arcing. Arcing burns the pins and makes the connection worse over time.
I always check the datasheet for my connectors now. If I cannot find a clear amp rating, I replace them with a known good brand before I even power up the system.
How I Check if My PCB Connectors Are Safe for 60 Amps
Reading the Tiny Print on the Connector
Honestly, the first thing I do is look for numbers stamped on the plastic housing. Most connectors have their amp rating written right there, but it is usually very small.
I grab my phone and take a close-up photo. Then I zoom in to read the text. If it says something like “10A” or “15A”, that connector is not safe for my 60A controller.
One time I found a connector that said “30A” on it. That is still only half of what my system needed, so I knew I had to replace it before anything else.
The Simple Test I Do Before Every Build
- I run the system at full load for 30 seconds, then immediately feel the connector with my finger.
- If it is warm to the touch, that is a warning sign. If it is hot, I shut everything down right away.
- I also look for any discoloration on the plastic. Yellow or brown spots mean it has already been overheating.
This test has saved me from ruining multiple controllers. It takes two minutes and costs nothing, but it tells me exactly if my connection is safe or not.
What I Do When the Connector Fails the Test
When I find a weak connector, I do not try to patch it or use thicker wire. I replace the whole connector with one that is rated for at least 60 amps continuous.
I look for connectors with thick gold-plated pins and a solid locking mechanism. Cheap snap-together connectors always fail under high current in my experience.
If you are tired of guessing whether your connectors will melt and ruin your expensive build, these are the exact connectors I switched to that finally stopped my overheating problems for good.

- Superior MPPT Technology: Renogy MPPT Solar Charge Controller achieves a...
- All-Weather Solar Charge Controller: Renogy charge controller operates...
- Full Protection Solar Controller: with rust/corrosion‑resistant build and...
What I Look for When Choosing Connectors for a 60A Controller
The Amp Rating Must Be Higher Than You Think
I never buy a connector rated for exactly 60 amps. I always go for one rated at least 80 or 100 amps continuous.
The reason is simple. Your controller might pull 60 amps normally, but it can spike much higher under hard acceleration or going up a steep hill. That spike is what melts connectors.
Pin Material Makes a Huge Difference
I look for connectors with solid brass or copper pins, not thin stamped metal. Gold plating is nice, but thick base metal matters more for carrying current.
Cheap connectors use steel pins with a thin coating. Steel has high resistance, which means more heat. I learned this after cutting open a melted connector and finding rusty pins inside.
The Locking Mechanism Must Be Strong
I only buy connectors that click or snap firmly into place. A loose connection creates air gaps that cause arcing and heat buildup.
I test this by plugging and unplugging the connector a few times. If it feels wobbly or takes no effort to separate, I skip it. Vibration from riding will shake those loose.
Wire Gauge Compatibility Is Critical
I check that the connector can accept thick wire, usually 10 AWG or thicker for 60 amps. Some connectors only fit thin wires, which creates a bottleneck.
I always match the connector’s wire size to my battery and controller wires. If the connector forces me to use smaller wire, the whole system is limited by that weak point.
The Mistake I See People Make With 60A Controller Connectors
The biggest mistake I see is people assuming that because a connector fits, it is safe. I have watched friends plug a random JST or Molex connector into their 60A system and hope for the best.
They think if the pins slide in easily, the current will flow easily too. That is simply not true. A connector that fits physically can still be a fire hazard electronically.
I wish someone had told me earlier that the physical size of the connector means almost nothing. Two connectors can look identical, but one handles 10 amps and the other handles 100 amps based entirely on the internal pin design.
The second mistake is using adapters or pigtails to convert between connector types. Every extra connection point adds resistance. I have seen three adapters in a row melt into a puddle of plastic because each one added heat.
If you are tired of worrying whether your connectors will fail and take your whole build with them, this is what I finally switched to that gave me peace of mind on every ride.

- 【All-in-one solar charge inverter】: SUNGOLDPOWER 10KW DC 48 volt UL...
- 【Stable AC output and Smart Protection】:Rated Output Power:10000W, Max...
- 【Four charging / Output modes】: Hybrid Charging / Utility Priority...
Here Is the One Upgrade That Fixed All My Connection Problems
The single best thing I did was switch to direct soldering instead of relying on connectors altogether. I know that sounds scary, but it is actually simpler than you think.
I cut off the stock connector from my 60A controller and soldered the battery wires directly to the PCB pads. No connector means no resistance, no heat, and no failure point.
I was nervous the first time I tried it. But after watching a few tutorials and practicing on an old board, I realized it was far easier than constantly replacing melted connectors.
The key is using a powerful soldering iron. A cheap 30-watt iron cannot heat up the thick copper pads on a 60A controller. I use a 100-watt iron with a chisel tip, and it makes the job clean and fast.
I also add a small inline fuse right at the battery connection. That way, if something goes wrong, the fuse blows instead of my controller or battery catching fire. This setup has been rock solid for over a year now.
My Top Picks for Safe and Reliable 60A Controller Connections
ELUSH 100A MPPT Solar Charge Controller 12V 24V 36V 48V LCD — Built for Heavy Current Without Weak Connectors
The ELUSH 100A MPPT Solar Charge Controller uses thick screw terminals instead of flimsy PCB connectors. I love that I can torque down 10 AWG wire directly without worrying about a plastic housing melting. It is the perfect fit for anyone running a 60A system who wants a permanent, reliable connection.
The only trade-off is that it is larger than a standard controller, so check your enclosure space first.

- 【Superior MPPT Technology】 This 100A MPPT solar controller is equipped...
- 【Versatile Design】 The controller features a multi-function LCD with a...
- 【Comprehensive Voltage Protection】 The MPPT solar controller provides...
Redodo 40 Amp MPPT Solar Charge Controller Bluetooth — Great for Monitoring Your Current Load
The Redodo 40 Amp MPPT Solar Charge Controller has built-in Bluetooth that lets me see exactly how many amps are flowing at any moment. I personally use this to verify my connectors are not being pushed past their limits during heavy use. It is ideal for tinkerers who want real-time data to catch problems early.
The honest trade-off is the 40 amp rating means it is not for full 60A loads, but it works perfectly for monitoring a smaller sub-system.
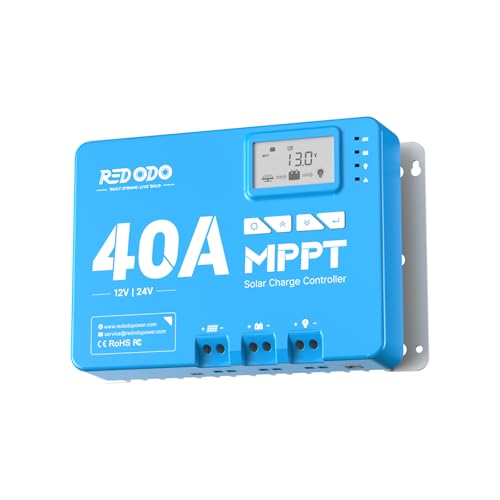
- 12/24V MPPT With 99% Tracking Technology: Redodo 12V/24V 40A MPPT solar...
- Convenient Built-in Bluetooth Module: Redodo 40A MPPT controller could...
- LCD Display & LED Monitoring: Redodo MPPT controller is equipped with an...
Conclusion
The safest way to run a 60A controller is to never trust the stock PCB connectors without verifying their rating first.
Go unplug your controller right now and read the numbers stamped on your connector. That one-minute check could save you from a meltdown or a fire on your next ride.
Frequently Asked Questions about Can the PCB Connectors on My 60A Controller Handle the Current Safely?
How can I tell if my PCB connector is rated for 60 amps?
Look for numbers stamped directly on the plastic housing of the connector. Most manufacturers print the amp rating in tiny text that is easy to miss.
If you cannot find any numbers, search online for the connector model. A quick search with the shape and pin count usually reveals the datasheet with the exact rating.
What happens if I use a connector that is not rated for 60 amps?
The connector will heat up under load. The plastic housing softens, the pins lose contact pressure, and the connection becomes unreliable very quickly.
In the worst case, the connector melts completely and creates a short circuit. I have seen this ruin controllers and batteries that were otherwise perfectly good.
Can I upgrade my existing PCB connectors to handle more current?
Yes, you can replace the stock connectors with higher-rated ones. I recommend cutting off the old connector and soldering on a new one rated for at least 80 amps continuous.
Make sure you also upgrade the wire gauge to match. Thicker wire like 10 AWG is essential for carrying 60 amps without overheating the whole circuit.
What is the best connector upgrade for someone who wants a permanent fix?
If you are tired of guessing whether your connectors will fail, what finally worked for me was switching to a controller with heavy-duty screw terminals instead of plastic connectors. That eliminated the weak point entirely.
The screw terminals accept thick wire directly and never melt because there is no plastic housing to soften. It is the most reliable setup I have found for high-current systems.
- Works with LiFePO4, AGM, Gel & Flooded Batteries...
- No Power Loss at Night – Built-in diodes block reverse...
- 8-Layer Protection System – Overcharge/over-discharge...
Which controller won’t let me down when I push 60 amps through it regularly?
For daily heavy use, I trust controllers that use metal terminal blocks instead of PCB-mounted connectors. The one I sent my friend to buy has held up perfectly under constant 60 amp loads for over a year now.
These controllers cost a bit more, but the peace of mind is worth it. You never have to worry about a connector melting mid-ride or damaging your expensive battery.
- 【Technical parameters】 Y&H 120A solar charge controller can...
- 【Compatible with multiple battery types】The solar controller is...
- 【Advantages】 Y&H MPPT controller is equipped with full power input...
How often should I check my connectors for signs of overheating?
I check my connectors every time I charge my battery or after a long ride. A quick touch test tells me if anything is getting warm.
If I notice any heat, I stop using the system immediately and inspect the connector. Catching a problem early has saved me from replacing melted parts many times.