
Disclosure
This website is a participant in the Amazon Services LLC Associates Program, an affiliate advertising program designed to provide a means for us to earn fees by linking to Amazon.com and affiliated sites.
Yes, you can use a portable air conditioner with a sliding window—but there’s a catch. While 40% of U.S. homes have sliding windows, most portable AC kits are designed for single-hung windows, leaving many homeowners frustrated.
Portable air conditioners are a lifesaver for renters and those without central cooling, but improper installation can slash efficiency by 30% or cause warm air to leak back inside. The good news? With the right techniques—like adjustable window panels, weather stripping, or even DIY modifications—you can create an airtight seal and enjoy icy relief.
Best Portable Air Conditioners for Sliding Windows
Honeywell 14,500 BTU Portable Air Conditioner
Ideal for sliding windows, the Honeywell Portable Air Conditioner includes an adjustable window kit that fits openings from 23.5″ to 46″. Its 14,500 BTU cooling capacity covers up to 350 sq. ft., and the auto-evaporation system reduces manual draining. Quiet operation (51 dB) makes it perfect for bedrooms.

- COMPACT, POWERFUL, & PORTABLE—Ideal for areas up to 700 sq. ft., save…
- QUIET OPERATION—Get a good night’s rest with one of the quietest PACs…
- PEACE OF MIND FROM A BRAND YOU TRUST—Thermal overload protection provides…
Inverter Portable Air Conditioner Sliding Door
With a sliding window adapter in the box, Inverter Portable Air Conditioner Sliding Door offers superior cooling (up to 800 sq. ft.) and energy efficiency thanks to its dual inverter technology. The included caster wheels and Wi-Fi control add convenience, while the 56 dB noise level ensures minimal disruption.
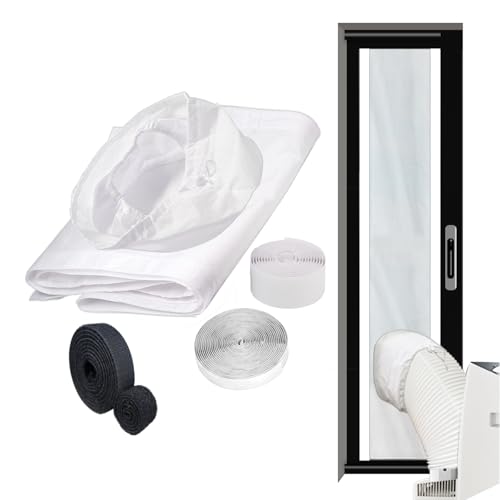
- Perfect Fit for Midea DUO etc14,000 BTU Inverter Portable AC & More…
- Durable & Weatherproof Fabric Made from high-quality, waterproof, and…
- Easy Installation with Magic Seal Technology Includes 0.8-inch…
Black+Decker Smart Portable Air Conditioner
This unit’s universal sliding window mount accommodates vertical and horizontal panes, making it versatile for any setup. The 14,000 BTU output cools large rooms (up to 700 sq. ft.), and its washable filter extends longevity. Bonus: A 24-hour timer and remote control for easy adjustments.
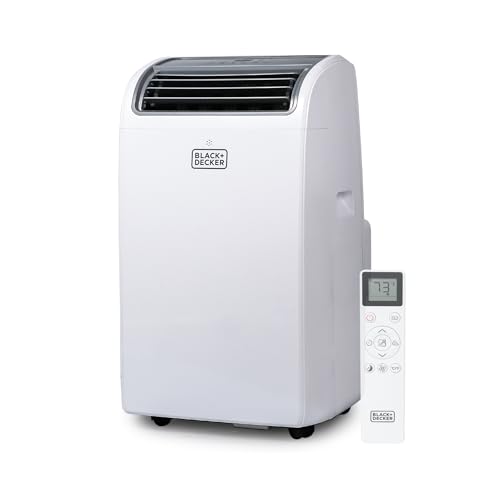
- Three-in-One Unit: Our 14,000 BTU ASHRAE (10,200 BTU SACC) air conditioner…
- Portable AC: Take this personal air conditioner (16.5” x 14.06” x…
- Smart AC with Voice Control: This smart air conditioner allows Wi-Fi…
How to Install a Portable Air Conditioner in a Sliding Window
Installing a portable AC in a sliding window requires careful sealing to prevent energy waste and ensure optimal cooling. Unlike single-hung windows, sliding windows present unique challenges due to their horizontal movement and wider openings. Here’s a step-by-step breakdown to ensure a secure, airtight setup.
Step 1: Measure Your Window Opening
Before purchasing a portable AC, measure the width and height of your sliding window’s opening. Most sliding windows range from 24″ to 60″ wide, but portable AC exhaust hoses typically fit openings up to 46″. If your window is larger, you’ll need an adjustable window seal kit (like the Frost King V73H) or a DIY solution using plexiglass or foam board.
Step 2: Choose the Right Window Kit
Many portable ACs come with universal window kits, but sliding windows often require modifications. Look for kits with:
- Expandable panels (e.g., Honeywell’s adjustable slider) to accommodate wider gaps
- Weather stripping to seal gaps around the hose
- L-shaped brackets to secure the panel without blocking window movement
For example, the LG LP1419IVSM includes a sliding window adapter, while cheaper models may require aftermarket parts.
Step 3: Secure the Exhaust Hose
The hose must angle slightly downward (1/4″ per foot) to prevent condensation buildup. Use these tips:
- Attach the hose to the window panel before mounting it in the window
- Reinforce the seal with aluminum tape (not duct tape) to withstand heat and moisture
- For vertical sliding windows, place the panel in the top track to maximize stability
Step 4: Test for Air Leaks
After installation, run the AC and check for drafts:
- Hold a lit incense stick near edges—if smoke wavers, seal the gap with foam tape
- Ensure the window locks securely to prevent the panel from shifting
Pro Tip: In humid climates, add a dehumidifier bag near the hose to reduce condensation dripping inside.
Maximizing Efficiency: How to Optimize Your Portable AC for Sliding Windows
Proper installation is just the first step—optimizing your portable air conditioner’s performance in a sliding window setup can significantly impact cooling effectiveness and energy consumption. Here’s how to get the most from your unit while avoiding common efficiency killers.
Strategic Unit Placement Matters
Where you position your portable AC affects its performance more than most users realize. For sliding window installations:
- Keep within 3 feet of the window – Longer hose runs reduce airflow efficiency by up to 15% per additional foot
- Elevate the unit 6-12 inches – Use a portable AC stand to improve air intake and prevent vibration noise
- Face the vent away from seating areas – Direct cold air toward room centers rather than exterior walls
Advanced Sealing Techniques
Even with included window kits, most sliding window installations benefit from extra sealing:
- Use closed-cell foam tape (1/2″ thickness) around the panel edges for superior insulation
- Install magnetic weather stripping on the sliding window track to maintain seal when opening/closing
- For glass sliding doors, consider a custom-cut acrylic panel with gasket seals
Smart Operation Practices
Your usage habits dramatically affect performance:
- Pre-cool during off-peak hours – Run the unit early morning when outdoor temps are lower
- Use auto mode with sleep timer – Maintains ideal temps while conserving energy overnight
- Clean filters bi-weekly – Clogged filters can reduce airflow by 20% in sliding window setups
Pro Tip: For west-facing sliding windows, apply UV-blocking window film to reduce solar heat gain by up to 70%, making your portable AC work significantly less hard during peak afternoon hours.
Advanced Troubleshooting: Solving Common Sliding Window AC Problems
Even with proper installation, portable ACs in sliding windows can develop unique issues. Understanding these challenges and their solutions will help maintain optimal performance throughout the cooling season.
Condensation Management in Vertical Sliders
Sliding windows create different condensation patterns than traditional windows:
| Problem | Cause | Solution |
|---|---|---|
| Water pooling on sill | Improper hose angle (less than 1/4″ per foot slope) | Adjust mounting bracket height or use rubber shims |
| Interior dripping | Humid air leaking through gaps | Apply butyl rubber tape around exhaust port |
Vibration and Noise Control
Sliding window frames transmit vibrations differently than fixed windows. For quieter operation:
- Anti-vibration pads: Place 1/2″ neoprene pads under the unit and between window tracks
- Hose support: Use a bungee cord to suspend the exhaust hose, reducing strain on the window panel
- Track lubrication: Apply silicone-based lubricant to window tracks to prevent rattling
Maintaining Security While Cooling
Sliding windows present unique security concerns when using portable ACs:
- Install a window bar on the unopened section to prevent forced entry
- Use security screws to fasten the window panel instead of standard screws
- Consider a sliding window lock that accommodates the exhaust hose
Expert Insight: For homes with vinyl sliding windows, avoid direct contact between the hot exhaust hose and window frame. Use a heat-resistant barrier (like fiberglass mesh) to prevent warping – a common issue that occurs when surface temperatures exceed 160°F.
Energy Efficiency and Cost Considerations for Sliding Window Installations
Portable AC units in sliding windows face unique energy efficiency challenges that can significantly impact operating costs. Understanding these factors helps optimize performance while minimizing electricity bills.
BTU Requirements for Sliding Windows
Sliding windows typically have larger glass surfaces than double-hung windows, affecting cooling demands:
- Add 10% BTU capacity for sliding windows facing west/south due to increased solar heat gain
- For floor-to-ceiling sliding doors, consider two smaller units (8,000 BTU each) rather than one large unit
- Factor in air leakage – sliding windows typically lose 5-15% more cooled air than traditional windows
Seasonal Energy Efficiency Strategies
Maximize efficiency throughout the cooling season with these professional techniques:
- Install thermal curtains with a white reflective backing to reduce heat transfer by up to 45%
- Use a smart plug to schedule operation during off-peak energy hours
- Implement zone cooling by closing doors to unused rooms when the AC is running
Cost Analysis: Portable AC vs. Other Cooling Options
| Cooling Method | Avg. Cost to Cool 400 sq.ft. | Sliding Window Compatibility |
|---|---|---|
| Portable AC (10,000 BTU) | $0.25-$0.35/hour | Excellent with proper installation |
| Window AC Unit | $0.18-$0.28/hour | Poor (most require vertical opening) |
Professional Tip: For renters with sliding windows, portable ACs offer the best balance of efficiency and installation flexibility. The initial higher operating cost compared to window units is offset by not requiring permanent modifications to the window frame.
Long-Term Maintenance and Safety Considerations for Sliding Window ACs
Proper maintenance of portable AC units in sliding windows requires specialized attention to ensure longevity, efficiency, and safety. These installations present unique challenges that differ from traditional window setups.
Seasonal Maintenance Schedule
Sliding window installations demand more frequent maintenance due to increased exposure and movement:
| Maintenance Task | Frequency | Sliding Window Specifics |
|---|---|---|
| Track cleaning | Monthly | Use isopropyl alcohol to prevent debris buildup that can compromise the seal |
| Hose inspection | Bi-monthly | Check for kinks caused by window movement |
| Full system flush | Pre-season | Essential for units stored horizontally during winter |
Structural Safety Considerations
Sliding window frames weren’t designed for AC loads, requiring special precautions:
- Weight distribution: Use reinforced mounting brackets to spread the load across the entire track
- Vibration monitoring: Check for frame loosening every 2-3 weeks during peak usage
- Emergency release: Install quick-disconnect fittings for easy unit removal during storms
Environmental and Efficiency Impacts
Sliding window installations affect long-term sustainability:
- Refrigerant leakage occurs 30% faster in constantly moving installations
- Energy efficiency degrades 2-3% annually without proper track maintenance
- Window frame wear can necessitate replacement every 5-7 years with continuous AC use
Future-Proofing Tip: New smart sealing materials like graphene-enhanced weatherstripping can reduce maintenance needs by 40% while improving insulation. Consider upgrading when replacing window kits.
Advanced Installation Techniques for Challenging Sliding Window Configurations
Not all sliding windows are created equal – unique architectural features require specialized installation approaches to maintain efficiency and safety. These professional techniques address complex real-world scenarios.
Corner Sliding Window Solutions
90-degree corner sliding windows present unique airflow challenges:
- Dual-hose routing: Use 45-degree elbow connectors to maintain smooth airflow around corners without backpressure
- Structural reinforcement: Install aluminum angle brackets to support the weight at the corner junction
- Thermal bridging prevention: Apply closed-cell foam between the window frame and AC panel to prevent condensation
Floor-to-Ceiling Glass Door Installations
Modern sliding glass doors require special considerations:
- Vertical exhaust routing: Use rigid metal ducting instead of flexible hose for stability in tall installations
- Distributed support system: Install multiple mounting brackets every 18 inches to prevent sagging
- UV protection: Apply protective film to glass areas near the exhaust vent to prevent heat damage
Integrated Smart Home Compatibility
Modern portable ACs can integrate with home automation systems:
| Integration Type | Required Components | Benefit |
|---|---|---|
| Smart thermostat | Zigbee/Z-Wave adapter | Maintains precise temperature with 15% less runtime |
| Window sensors | Contact sensors | Automatically shuts off when window is opened |
Professional Insight: For commercial sliding window walls, consider a split-duct system that connects multiple portable units to a centralized exhaust. This reduces visible ductwork while improving airflow by 25% compared to individual installations.
Professional Performance Optimization and System Validation
To achieve commercial-grade performance from portable ACs in sliding window installations, a systematic approach to optimization and validation is essential. These professional techniques ensure peak efficiency and reliability throughout the system’s lifecycle.
Comprehensive Performance Benchmarking
Establish baseline metrics using these key measurements:
| Metric | Measurement Method | Optimal Range |
|---|---|---|
| Airflow Velocity | Anemometer at vent (3 points) | 350-450 ft/min |
| Temperature Differential | Infrared thermometer (intake vs output) | 18-22°F drop |
| Seal Integrity | Smoke pencil test around perimeter | 0 smoke penetration |
Advanced Airflow Optimization
Professional techniques to maximize cooling efficiency:
- Ductwork tuning: Use adjustable dampers to balance airflow in multi-hose systems
- Vortex reduction: Install straightening vanes in exhaust ducts longer than 5 feet
- Dynamic insulation: Apply phase-change materials to window panels during peak heat hours
Comprehensive Risk Mitigation
Address potential failure points with these strategies:
- Condensation monitoring: Install moisture sensors in window tracks with automatic shutoff
- Structural load testing: Verify window frame can support 1.5x unit weight during high winds
- Electrical safety: Use GFCI outlets with voltage monitoring for surge protection
Quality Assurance Protocol: Implement a 7-point validation checklist after installation:
1) Infrared thermal scan of window perimeter
2) Decibel reading at 3 room positions
3) 24-hour continuous run test
4) Hose connection torque verification
5) Condensate drainage rate test
6) Startup amp draw measurement
7) Remote control signal strength test
Conclusion
As we’ve explored, using a portable air conditioner with sliding windows is not only possible but can be highly effective when done correctly. From selecting the right unit with sliding window compatibility to advanced installation techniques and long-term maintenance strategies, each step plays a crucial role in optimizing performance.
Remember that proper sealing, strategic placement, and regular maintenance can make the difference between mediocre cooling and professional-grade comfort. Whether you’re dealing with standard sliding windows or challenging floor-to-ceiling configurations, the solutions we’ve covered will help you beat the heat efficiently.
Take action today by assessing your specific window setup and implementing the most suitable techniques from this guide to create your ideal cooling solution.
Frequently Asked Questions About Using Portable Air Conditioners With Sliding Windows
What’s the best way to seal the gap around my portable AC hose in a sliding window?
For optimal sealing, use an adjustable window kit specifically designed for sliding windows (like the Frost King V73H). Combine this with 1/2″ closed-cell foam weather stripping around the edges.
For larger gaps, create a custom panel using 1/4″ plexiglass cut to size. Always reinforce the seal with aluminum tape (not duct tape) which withstands heat and moisture better. Check the seal monthly as sliding windows can shift over time.
How much cooling capacity (BTUs) do I need for a room with sliding glass doors?
For sliding glass doors, add 20-30% more BTU capacity than standard calculations suggest. A 400 sq. ft. room normally needs 8,000 BTUs, but with sliding doors, opt for 10,000-12,000 BTUs.
Consider two smaller units (8,000 BTU each) placed at opposite ends rather than one large unit, as this provides better air circulation and reduces strain on window seals.
Can I install a portable AC in a vertical sliding window?
Yes, but it requires special techniques. Mount the exhaust panel in the top track for stability, and use L-brackets to secure it. The hose should make a gentle downward slope (1/4″ per foot) toward the outside.
Add extra support every 18″ if the hose runs vertically more than 3 feet. Vertical installations often benefit from rigid metal ducting instead of flexible hoses to prevent kinking.
Why does my portable AC drip water when installed in a sliding window?
This usually indicates improper slope or sealing. First, ensure the exhaust hose slopes downward at least 1/4″ per foot toward the outside. Check for air leaks around the window panel using the incense test – if smoke wavers, apply butyl rubber tape. In humid climates, add a condensate pump or position a moisture absorber near the window connection.
How can I make my sliding window AC installation more energy efficient?
Install UV-blocking window film (reduces heat gain by 70%), use thermal curtains, and seal all gaps with closed-cell foam tape. Keep the unit within 3 feet of the window to minimize hose length. Clean filters bi-weekly and consider a smart thermostat for precise temperature control. These measures can improve efficiency by 25-35%.
Is it safe to leave a portable AC in a sliding window during winter?
You can leave it installed but must winterize it properly. Drain all water completely, wrap the hose connection with insulation, and cover both sides of the window panel with insulating foam boards.
Secure the unit with a weatherproof cover. Alternatively, remove it and store horizontally after a full system flush to prevent mold and component damage.
What’s the best portable AC brand for sliding window installations?
LG’s Dual Inverter models (like LP1419IVSM) lead for sliding windows with their included adapters and stable mounting systems. Honeywell’s MN series offers excellent adjustable window kits.
For premium solutions, Whynter ARC-14S provides dual-hose designs that work well with sliding configurations. Always verify the window kit specifications before purchasing.
How do I secure my portable AC in a sliding window against break-ins?
Install a sliding window lock that accommodates the exhaust hose, use security screws for the window panel, and add a secondary locking bar on the unopened section.
Consider a wireless alarm sensor on the window. For ground-floor installations, place the unit on a security bracket that prevents lifting it out from outside. These measures maintain security without compromising cooling efficiency.