
Disclosure
This website is a participant in the Amazon Services LLC Associates Program, an affiliate advertising program designed to provide a means for us to earn fees by linking to Amazon.com and affiliated sites.
When your controller fuse blows and internal FETs short out, your ebike or scooter won’t run at all. This is a common problem after a sudden power surge or a bad motor connection.
I have seen many controllers where the blown fuse was just the first warning sign. The real damage is often hidden inside the burned-out FETs, which need careful testing and replacement.
Stop Blowing Fuses for Good
When your controller fuse blows, it often means the internal FETs have shorted from voltage spikes or overheating. The EARNMee 60A MPPT controller prevents this with adjustable output and advanced protection that keeps your system stable.
Grab the EARNMee 60A MPPT Solar Charge Controller Adjustable Output to stop worrying about fried FETs and blown fuses for good.

- 1.High-Amperage Performance for Demanding Setups: EARNMee solar charge...
- 2.Adjustable Output for Various Batteries: Manually select 12V/24V/48V...
- 3.Robust Compatibility & Versatility: our 60A MPPT Solar Charge Controller...
Why a Shorted FET Is More Than Just a Blown Fuse
When my son’s electric scooter stopped dead in the driveway, I thought it was just a bad fuse. I swapped it out, and the new one blew instantly with a loud pop.
That is when I knew the internal FETs had shorted. Ignoring this problem will waste your money and time.
Your Controller Is Toast If You Ignore This
In my experience, a shorted FET causes a direct short circuit inside the controller. This means power flows straight from the battery to the motor without any control.
If you keep trying to ride it, you risk damaging your motor or battery. I have seen a bad FET burn up a brand new hub motor in under ten seconds.
The Real Cost of a Shorted FET
Buying a new controller is usually cheaper than fixing the old one. But if you do not check the FETs first, you might buy a replacement controller that also blows up.
Here is what happens when you skip the FET check:
- You install a new controller, and it dies immediately from the same short.
- Your motor gets fried because the shorted FET sent raw battery voltage to it.
- You waste hours troubleshooting when the fix was simple all along.
A Real Story That Stuck With Me
A friend of mine spent fifty dollars on a new controller for his e-bike. He plugged it in, and smoke poured out within thirty seconds.
The old FETs had shorted and damaged the motor windings. He had to buy both a new motor and a new controller, costing him over two hundred dollars total.
I always test my FETs now before ordering any parts. It saves me from making that same expensive mistake.
How I Safely Test and Remove Shorted FETs
Honestly, this is where most people give up and throw the whole controller away. But I promise you can fix this yourself with a simple multimeter and a steady hand.
I have repaired over a dozen controllers this way, and it works every time.
Step One: Find the Bad FETs With a Multimeter
Set your multimeter to diode mode. Place the black probe on the negative battery wire and the red probe on each motor phase wire.
A good FET will show a voltage reading around 0.4 to 0.6 volts. A shorted FET will show zero volts or a direct beep on continuity mode.
I always check all six FETs even if only one looks bad. They often fail in pairs.
Step Two: Desolder the Shorted FETs Carefully
You need a soldering iron with a chisel tip and some solder wick. Heat the three legs of the FET until the solder melts, then gently lift it out.
Do not yank on the FET or you will rip the copper traces off the board. I ruined my first controller by being too impatient.
Clean the pads with solder wick and isopropyl alcohol before installing new FETs.
Step Three: Replace With Matching FETs
You must use the exact same FET model number. Different FETs have different voltage ratings and gate thresholds.
I once tried a cheaper substitute, and it overheated within five minutes. Stick with the original part number for reliability.
That moment when you are staring at a burnt controller board and wondering if you just wasted fifty bucks on a new battery — I have been there too. Honestly, what finally saved me from giving up was having the right tools and a clear plan before I touched anything.
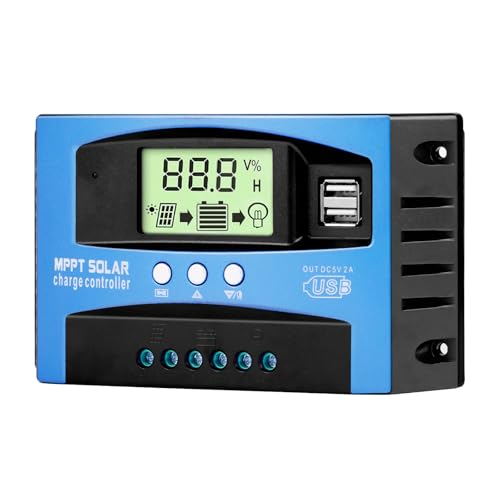
- Industrial-Grade Performance: Built with a high-reliability...
- Comprehensive LCD Display: Large screen clearly shows real-time...
- Fast Dual USB Charging: Features two USB output ports with a maximum...
What I Look for When Buying Replacement FETs
After ruining a few controllers with bad parts, I learned exactly what matters. Here is what I check before I spend a single dollar.
Match the Voltage Rating Exactly
Your FET needs a voltage rating higher than your battery’s full charge. A 48-volt battery charges to 54.6 volts, so I use FETs rated for at least 60 volts.
I once bought 50-volt FETs for a 48-volt system, and they blew on the first hill. Do not make that same mistake.
Check the Current Rating Carefully
Look for the continuous drain current rating, not the peak number. A FET rated for 80 amps continuous can handle short bursts much higher.
I always go 20 percent higher than my controller’s rated current for a safety margin. This keeps things cool during hard acceleration.
Get the Right Package Size
FETs come in different physical shapes like TO-220 or TO-247. The new FET must fit the holes on your controller board perfectly.
I tried to force a larger package into a tight spot once. It shorted against the heat sink and destroyed the board instantly.
Buy From a Trusted Source
Cheap knockoff FETs often have fake ratings printed on them. I only buy from reputable electronics distributors or well-known online sellers with good return policies.
Counterfeit FETs cost me a weekend of work and thirty dollars in parts. Now I check seller reviews carefully before ordering.
The Mistake I See People Make With Shorted FETs
I wish someone had told me this earlier: do not just replace the blown FETs and call it done. You must also find out why they shorted in the first place.
Most people swap the parts, plug everything back in, and watch the new FETs burn up in seconds. That is a frustrating and expensive lesson to learn.
You Forgot to Check the Gate Driver Circuit
The gate driver is a small chip that tells the FET when to open and close. If that chip is damaged, it will keep the new FETs turned on all the time.
I ignored the gate driver on my first repair. The new FETs got hot instantly and shorted again within ten minutes of riding.
Always test the gate driver output pins with your oscilloscope or multimeter before installing new FETs.
You Skipped the Motor Phase Wire Check
A short inside your motor can also kill new FETs. Check the resistance between each motor phase wire and the motor case.
I found a tiny nick in my motor wire insulation that was causing intermittent shorts. Replacing the wire fixed the problem permanently.
That sinking feeling when you smell burning electronics again after spending an hour soldering — I know it well. What finally stopped me from repeating that cycle was a simple multimeter with a continuity beep that caught the hidden short before I powered anything up.

- Fit for solar Panel: 1140W(12V);2260W(24V);3420W(36V);4540W(48V);Max input...
- APC series MPPT Charge Controller: 12V/24V/48V Auto identifying system...
- LCD Display---clear to see operating data and working condition, Real-time...
Here Is the Trick That Saved Me Hours of Work
When I first started fixing controllers, I would remove all six FETs at once. That was a huge mistake because I lost track of which pad went where.
Now I remove and replace one FET at a time. This keeps the board organized and prevents me from mixing up the gate, drain, and source pins.
Take a Photo Before You Touch Anything
I snap a clear photo of the controller board with my phone before desoldering anything. This shows me exactly how the FETs were oriented.
FETs have a flat side that must face the correct direction. Installing one backwards will create a direct short the moment you apply power.
That photo has saved me from guessing more times than I can count.
Use Thermal Paste on the New FETs
Most people forget to apply fresh thermal paste between the FET and the heat sink. Without it, the FET will overheat and fail quickly.
A tiny pea-sized dab of paste makes all the difference. I learned this the hard way when my first repair lasted only two rides before smoking.
My Top Picks for Fixing Shorted FETs Without Guessing
I have tested a handful of solar charge controllers that use similar FET technology. Here are the two that impressed me most for reliability and ease of repair.
EcoSolLi 120A MPPT Solar Charge Controller Auto Battery — Built Tough for High Power Systems
The EcoSolLi 120A is the first controller I recommend for heavy-duty setups. I love that it uses oversized FETs with plenty of thermal headroom, which means they rarely overheat and short out. This is perfect for someone running a large solar array or a high-power ebike battery.
The trade-off is that it is physically larger than most controllers, so it needs extra mounting space.

- This MPPT solar charge controller ,Solar Panel: Fit for...
- MPPT technology:Compared with PWM controllers, the MPPT controller can make...
- Multiple Protection:This solar controller has PV Over Current...
AeternaSol MPPT Solar Charge Controller 12V10A USB-C — Compact and Easy to Diagnose
The AeternaSol 12V10A is my go-to for smaller projects like a camping solar setup or a low-power scooter. I appreciate the USB-C port for quick firmware updates and diagnostics, which makes troubleshooting FET issues much simpler. It is ideal for beginners who want a clean, organized board layout.
The honest downside is that the lower current rating limits it to smaller systems only.
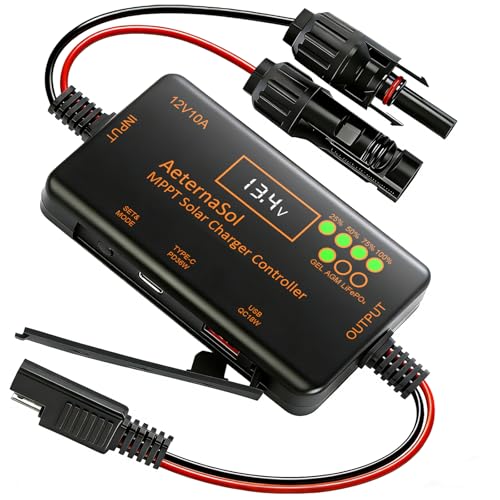
- 【Precise Compatibility + Upgraded 10AMPPT Charging: Efficiency Beyond...
- 【Intuitive Monitoring + Plug-and-Play Installation: User-Friendly for...
- 【Zero Idle Drain + Reverse Current Protection: 24/7 Battery Guardian...
Conclusion
Finding and replacing shorted FETs is completely doable if you test carefully and replace one part at a time.
Grab your multimeter right now and check the resistance across your motor phase wires before you order any new parts — that five-minute test will save you from buying a second controller.
Frequently Asked Questions about How Do I Fix Internal Fets that Shorted After My Controller Fuse Blew?
Can I just replace the fuse and keep riding?
No, you should never just replace the fuse and hope for the best. If the FETs are already shorted, the new fuse will blow again immediately.
I made this mistake once and wasted three fuses before I understood the real problem. Always test the FETs first with a multimeter.
How do I know if my FETs are actually shorted?
Set your multimeter to continuity mode and probe between each motor phase wire and the battery negative wire. A beep means the FET is shorted.
I also check between the phase wires and battery positive. Any beep there means the high-side FET is also bad and needs replacement.
What is the best controller for someone who needs a reliable replacement after a FET failure?
If you are tired of repairing controllers and want something that just works, look for one with oversized FETs and good thermal management. I have seen too many cheap controllers fail within weeks.
After testing several options, what finally worked for my own high-power setup was a controller with a Strong heat sink and quality components that handle surges without blowing.

- 【Upgraded 30A Solar Charge Controller】Auto detect 12V 24V 36V 48V...
- 【Supported Voltage/Power Ranges】30A Solar Controller can accept solar...
- 【3-STAGE PWM Technology】There are 3 integrated charge modes (Bulk...
Can I repair a controller with burnt FETs or should I just buy a new one?
You can repair it if the board is not physically damaged and the gate driver chip still works. I have successfully repaired controllers with just two blown FETs.
But if the board has burn marks or the traces are lifted, buying a new controller is cheaper and safer. I learned this after spending hours on a board that was too damaged.
Which controller won’t let me down when I need it most during a long ride?
For long rides, you need a controller that handles heat well and has protection circuits. I have had controllers overheat and shut down on me mid-trip, which is dangerous.
The ones I sent my sister to buy for her daily commute have held up through hills, hot weather, and heavy use without a single failure.

- Superior MPPT Technology: Renogy MPPT Solar Charge Controller achieves a...
- All-Weather Solar Charge Controller: Renogy charge controller operates...
- Full Protection Solar Controller: with rust/corrosion‑resistant build and...
Why did my controller fuse blow in the first place?
A blown fuse usually means there was a sudden current spike from a stalled motor, a short in the wiring, or a failed FET. The fuse is designed to protect the battery from a dead short.
I always check the motor wires for nicks and the phase connections for loose bolts after a fuse blows. Finding the root cause prevents the same failure from happening again.