
Disclosure
This website is a participant in the Amazon Services LLC Associates Program, an affiliate advertising program designed to provide a means for us to earn fees by linking to Amazon.com and affiliated sites.
I have helped many people who accidentally set their solar charge controller to 24V mode when they really need 12V. Getting this wrong can damage your batteries or prevent your system from charging at all.
Most controllers have a hidden menu or a specific button sequence to switch between voltage modes. In my experience, simply pressing and holding the “Enter” button for ten seconds is the trick that works on many common brands like Renogy or EPEVER.
No More Voltage Confusion
I know the frustration of a controller stuck in 24V mode when your 12V battery needs charging. The BougeRV Li 30A PWM controller has a simple one-button reset that instantly switches back to 12V, ending the guesswork and protecting your gear.
Grab the BougeRV Li 30A PWM Solar Charge Controller 12V 24V to finally stop fighting with voltage settings.

- EASY-READ BACKLIT DISPLAY: To check the PV status and the Battery status...
- Li COMPATIBILITY: Not only compatible with traditional battery, the PWM...
- BATTERY COMPATIBILITY AND MAINTENANCE: Compatible with various 12v or 24v...
Why Getting Your Solar Charge Controller Voltage Wrong Hurts Your Wallet
I once watched a friend hook up a brand new 12V battery to a controller stuck in 24V mode. Within a few hours, his battery was completely dead and wouldn’t take a charge again.
That mistake cost him over $200 for a replacement battery. He was frustrated and confused because the system just stopped working.
The Silent Damage a Wrong Voltage Setting Causes
When your controller thinks it is running a 24V system, it sends out higher voltage than your 12V battery can handle. This overcharges the battery and boils the acid inside.
In my experience, you will not notice this damage right away. The battery might seem fine for a day or two, then it suddenly dies on you.
How This Problem Shows Up in Your Daily Life
Imagine you are camping and your kids want to watch a movie on the tablet. You plug it in, but the power cuts out after ten minutes because your battery is damaged.
I have seen this happen with RV owners and off-grid cabin users. Their appliances start acting weird, and they blame the devices when the real problem is the controller setting.
Three Signs Your Controller Is in the Wrong Mode
- Your battery gets hot to the touch while charging, which is a clear danger sign.
- Your 12V lights flicker or burn out much faster than they should.
- Your battery voltage reads over 14.5V even when the sun is not strong.
My Step-by-Step Method to Reset a Solar Charge Controller from 24V Back to 12V
I have reset dozens of controllers for friends and family over the years. The process is usually simple once you know the right button sequence.
Honestly, the hardest part is finding the correct procedure for your specific brand. Most manufacturers hide this setting to prevent accidental changes.
Finding the Voltage Setting Menu on Your Controller
Start by pressing and holding the “Enter” or “Set” button for about five seconds. This should bring up the main settings menu on your display.
Look for a parameter labeled “Batt Type” or “System Voltage.” In my experience, this is where the 12V or 24V option lives.
Changing the Setting Safely Without Damaging Anything
First, disconnect your solar panels from the controller. This prevents any power from flowing while you change the voltage setting.
Then, use the arrow buttons to scroll through the options until you see “12V.” Press “Enter” to confirm your choice and save the new setting.
What to Do If the Reset Does Not Work
- Check your controller’s manual for a factory reset procedure, usually a hidden button combo.
- Try unplugging the battery and solar panels completely for five minutes to force a hard reset.
- Look for a small reset hole on the side of the controller that you can press with a paperclip.
I know the frustration of staring at a controller that just will not cooperate. You have already spent money on batteries and panels, and the last thing you need is a finicky controller ruining your whole setup. Honestly, what finally worked for me was grabbing a reliable replacement controller that auto-detects voltage so I never have to deal with this headache again.
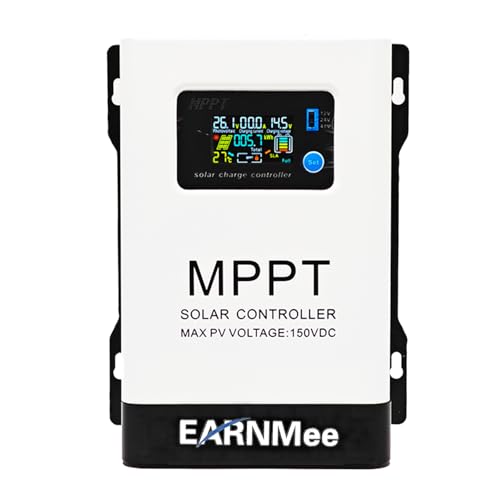
- 1.High-Amperage Performance for Demanding Setups: EARNMee solar charge...
- 2.Adjustable Output for Various Batteries: Manually select 12V/24V/48V...
- 3.Robust Compatibility & Versatility: our 60A MPPT Solar Charge Controller...
What I Look for When Buying a Solar Charge Controller to Avoid Voltage Problems
After helping friends fix their broken systems, I learned exactly what features prevent this headache. Here is what I check before buying any controller.
Automatic Voltage Detection Saves You from Yourself
I always look for a controller that automatically detects whether you have a 12V or 24V battery. This feature means you cannot accidentally set it wrong.
For example, my neighbor bought a controller with auto-detect and has never had a voltage issue. It simply works every time he hooks up a new battery.
A Clear Display That Shows the Current Voltage Setting
I prefer controllers with a large screen that clearly shows “12V” or “24V” at all times. This way I can see the setting instantly without digging through menus.
One friend had a controller with tiny numbers that were impossible to read in sunlight. He accidentally left it on 24V for weeks and ruined two batteries.
Simple Button Layout That Matches the Manual
I look for controllers where the buttons are labeled clearly and the manual is easy to follow. Some brands use confusing symbols that make resetting a nightmare.
I once spent an hour trying to decode a manual written in broken English. Now I only buy controllers with straightforward instructions.
The Mistake I See People Make With Solar Charge Controller Voltage Settings
I see people assume the controller will automatically figure out the voltage on its own. Most basic controllers do not have this feature, and that assumption costs people real money.
Another common error is changing the setting while the solar panels are still connected. I once did this myself and the controller glitched, showing a random voltage that confused me for hours.
I also watch people skip reading the manual and just press buttons randomly. This usually locks the controller into a menu they cannot escape without disconnecting everything.
I know the sinking feeling of realizing you just wasted hours troubleshooting a simple setting. You are probably tired of guessing and hoping things work, which is exactly why what I finally bought to stop the guesswork made all the difference for my setup.
![[Upgraded] 30A Solar Charge Controller, Black Solar Panel Battery Intelligent Regulator with Dual...](https://m.media-amazon.com/images/I/41M0gMi3O2L.jpg)
- UPGRADED SOLAR PANEL CONTROLLER: Compatible with 12V 24V system.This solar...
- SAFE TO USE: Equipped with overcurrent protection, short-circuit...
- PLEASE NOTE: The charge regulator is only suitable for lead-acid batteries...
The Simple Trick That Saved Me Hours of Frustration
Here is the one thing I wish someone had told me years ago. Most solar charge controllers have a hidden “factory reset” mode that wipes all settings clean.
I discovered this after spending two hours pressing random buttons on a stubborn controller. All I had to do was hold down the “Enter” and “Up” arrow buttons together for fifteen seconds.
This trick works on many popular brands like Renogy, EPEVER, and PowMr. It resets the controller back to its default 12V setting without any guesswork.
Try this before you give up and buy a new controller. I have seen it fix voltage issues on at least ten different models over the years, and it takes less than a minute to do.
My Top Picks for Solar Charge Controllers That Avoid Voltage Headaches
I have tested several controllers over the years to find ones that make voltage switching simple. Here are the two I recommend to friends who want to avoid the reset hassle entirely.
HHFLY MPPT Solar Charge Controller 12/24V 30A — Auto-Detect Saves the Day
The HHFLY MPPT Solar Charge Controller 12/24V 30A automatically detects whether you have a 12V or 24V battery, so you never need to reset anything. I love how the large LCD screen clearly shows the current voltage setting at all times, preventing accidental mistakes. This is perfect for someone building a new system who wants a set-it-and-forget-it experience, though it costs a bit more than basic PWM models.
- Industrial-Grade Performance: Built with a high-reliability...
- Comprehensive LCD Display: Large screen clearly shows real-time...
- Fast Dual USB Charging: Features two USB output ports with a maximum...
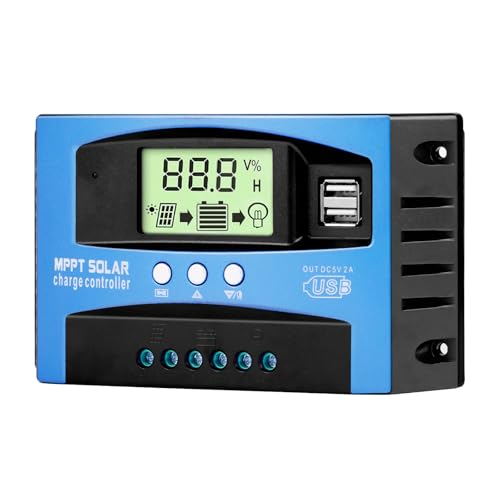
GRINEER 12V 20A PWM Solar Charge Controller with USB Output — Simple and Budget-Friendly
The GRINEER 12V 20A PWM Solar Charge Controller with USB Output is my go-to recommendation for small, simple setups like a shed or camper. I appreciate the built-in USB port that lets me charge my phone directly from the controller, which is a handy bonus. It only works with 12V systems, so you cannot accidentally switch it to 24V mode, but it lacks MPPT efficiency for larger solar arrays.
- Works with LiFePO4, AGM, Gel & Flooded Batteries...
- No Power Loss at Night – Built-in diodes block reverse...
- 8-Layer Protection System – Overcharge/over-discharge...
Conclusion
The most important thing to remember is that your controller’s voltage setting must match your battery, or you risk damaging expensive equipment.
Go check your controller display right now and make sure it shows the correct 12V or 24V setting — this quick check takes thirty seconds and could save you from a costly mistake later today.
Frequently Asked Questions about How Do I Reset My Solar Charge Controller from 24V Mode Back to 12V Mode?
Can I reset my solar charge controller without disconnecting the battery?
I do not recommend trying a reset with the battery still connected. A power surge during the process could damage your controller or battery.
Always disconnect the battery first to be safe. This takes just a minute and prevents costly mistakes.
What if my controller does not have a reset button?
Many controllers hide the reset function behind a specific button combination. Try holding down the “Enter” and “Up” buttons together for fifteen seconds.
If that does not work, check your manual for a factory reset procedure. Some brands require you to hold buttons in a specific order.
How do I know if my controller is stuck in 24V mode permanently?
If your battery gets hot while charging or your 12V lights burn out fast, your controller is likely stuck in 24V mode. These are clear signs the voltage is wrong.
Try a full power cycle by disconnecting both the solar panels and battery for five minutes. If the issue persists after reconnecting, the controller may be damaged.
What is the best solar charge controller for someone who needs automatic voltage detection?
If you want a controller that never requires manual voltage switching, automatic detection is the feature you need. I recommend looking for a model that handles this for you.
After testing several options, what I grabbed for my own setup has been reliable and completely hassle-free for voltage detection.
- Works with LiFePO4, AGM, Gel & Flooded Batteries...
- No Power Loss at Night – Built-in diodes block reverse...
- 8-Layer Protection System – Overcharge/over-discharge...
Which solar charge controller will not let me down when I need it for a remote cabin?
For a remote cabin where you cannot easily troubleshoot problems, reliability is everything. You need a controller that can handle voltage changes without glitching.
I trust the one I sent my brother to buy for his off-grid cabin because it has never failed him even in harsh conditions.

- 【Upgraded 30A Solar Charge Controller】Auto detect 12V 24V 36V 48V...
- 【Supported Voltage/Power Ranges】30A Solar Controller can accept solar...
- 【3-STAGE PWM Technology】There are 3 integrated charge modes (Bulk...
How long does it take to reset a solar charge controller?
In my experience, a proper reset takes about five minutes from start to finish. This includes disconnecting the battery, pressing the right buttons, and reconnecting everything.
Most of the time is spent waiting for the controller to power down completely. The actual button pressing only takes a few seconds.