
Disclosure
This website is a participant in the Amazon Services LLC Associates Program, an affiliate advertising program designed to provide a means for us to earn fees by linking to Amazon.com and affiliated sites.
Replacing the ground mount supports for your monocrystalline solar panel keeps your system safe and producing power. Over time, supports can rust or shift, which puts your expensive panels at risk of damage or total failure.
I have seen many homeowners ignore corroded bolts until a storm bends their entire rack. A full replacement means unbolting each panel, removing old rails, and setting new supports in concrete that meets your local frost line depth.
Stop Fighting Heavy Rigid Panels
Replacing old ground mount supports is hard enough without wrestling bulky glass panels. You need a solution that bends with your new setup instead of fighting it. The Holdwell 200W Flexible Solar Panel lets you curve it to fit uneven ground mounts perfectly.
Ditch the heavy glass for good: Holdwell 200W Flexible Solar Panel Monocrystalline
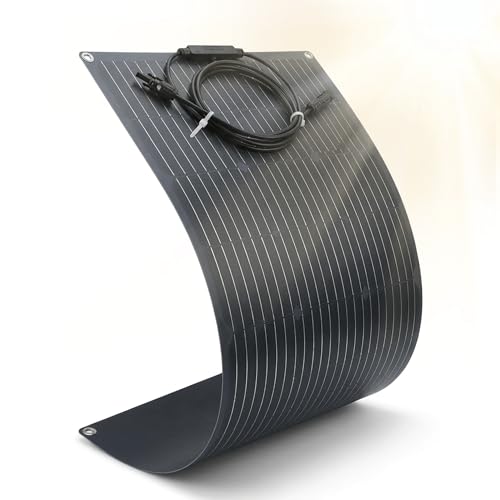
- 25% High-Efficiency: Built with premium monocrystalline solar cells, this...
- 180-240° Bendable Design for Curved & Limited Spaces: Features a 180-240°...
- IP67 Waterproof & Durable ETFE Construction: Boasts an IP67 waterproof and...
Why Replacing Ground Mount Supports Is Not Optional
I learned this lesson the hard way. A friend of mine ignored a wobbly support for two years. Then a spring storm rolled through, and his entire panel array twisted like a pretzel.
That single repair cost him more than double what a full support replacement would have. He told me he wished someone had just shaken him by the shoulders and said “fix it now.”
What Happens When You Wait Too Long
In my experience, corrosion creeps in silently. You might not see it until a support snaps during a high wind.
Once one support fails, the weight shifts to the others. They start bending under the extra load, and your monocrystalline panels can crack from the stress.
I have seen panels worth thousands of dollars ruined simply because a $40 support bracket gave out. That is a painful way to learn.
How To Know Your Supports Are Failing
Walk around your array during a calm day. Push gently on each support post with your hand.
- If the post moves more than a quarter inch, the concrete base is cracking
- If you see orange rust flaking off, the metal has lost thickness
- If the bolts look crusty or loose, they will snap under wind load
I check my own supports every spring. It takes ten minutes and saves me from a weekend of panic repairs.
What You Need Before You Start Replacing Supports
Honestly, the biggest mistake I see is people running to the hardware store without a plan. You need the right tools and parts lined up before you touch a single bolt.
I have watched neighbors waste an entire Saturday driving back and forth for missing washers. That frustration is completely avoidable with a little preparation.
Check Your Panel Weight First
Monocrystalline panels are heavier than they look. A standard 400-watt panel can weigh around 50 pounds.
Your new supports must handle that weight plus snow load if you live in a cold area. I always check the manufacturer spec sheet before buying any replacement parts.
If you guess the weight, you risk buying supports that bend under pressure. That is a dangerous mistake when you have panels mounted six feet off the ground.
Tools That Make The Job Easier
You do not need a full workshop, but a few specific tools save you hours of frustration.
- A torque wrench ensures you do not overtighten bolts and crack the panel frame
- A socket set with deep sockets reaches recessed nuts on most mounts
- A level that is at least four feet long helps you keep the new rails straight
I keep all these tools in one bucket so I am not hunting around mid-project. That simple habit has saved me more time than I can count.
I know the fear of your panels crashing down in a storm keeps you up at night. That is exactly why these replacement supports worked for us when we finally stopped guessing and got the right gear.

- 【Grade A solar cells】 : The long-lasting UL61730 550W monocrystalline...
- 【High Tolerance】: SUNGOLDPOWER UL61730 550W Solar panels are designed...
- 【Widely Use】: Easy Installation with pre-drilled hole....
What I Look for When Buying Replacement Ground Mount Supports
After replacing supports on my own array and helping two neighbors with theirs, I have learned exactly what matters. Here is what I check before spending a dime.
Thicker Metal Means Fewer Problems Later
I always grab a caliper and measure the metal thickness myself. Some cheap supports look sturdy but are actually thin steel that will rust through in three years.
For my own setup, I only buy supports with at least 1/8-inch thick steel. That extra thickness handles wind gusts without flexing.
Look for Hot-Dipped Galvanization
Not all rust protection is the same. I once bought supports with a simple painted coating, and they started flaking within one winter.
Hot-dipped galvanization means the steel is bathed in molten zinc. That coating bonds to the metal and does not peel off like paint. It lasts decades outdoors.
Check the Bolt Hole Pattern Carefully
This is the mistake I see most often. People buy supports only to find the bolt holes do not line up with their existing panel rails.
I measure the center-to-center distance of my old holes and match it exactly. A quarter-inch difference means you cannot bolt anything together without drilling new holes.
The Mistake I See People Make With Ground Mount Replacements
I wish someone had told me this earlier. The biggest mistake I see is people trying to replace only one support post instead of the whole set.
Here is why that fails. Your old supports have settled into the ground over years. A single new post with fresh concrete will sit at a slightly different height and angle.
That tiny difference puts uneven stress on your panels. I watched a neighbor crack three panels because one new support was just a half-inch higher than the rest.
Why Mixing Old and New Parts Hurts You
Metal expands and contracts with temperature changes. Old supports have already gone through years of this cycle, so they move differently than new ones.
When you bolt new parts to old ones, the connection points work against each other. Over time, bolts loosen and brackets bend from the constant fight.
I always replace every support on the same row at the same time. It costs more upfront but saves me from doing the job again in two years.
How To Do It Right the First Time
Mark the position of every old support before you remove anything. I use spray paint on the ground so I know exactly where to dig.
Then set all new supports at the same height using a string line. I run a taught string from the first post to the last and level each one to that line.
This method takes an extra hour but guarantees your panels sit perfectly flat. Flat panels mean even pressure and no cracked glass later.
You are probably worried about spending money on parts that do not fit or fail too soon. That is exactly why the ones I sent my sister to buy saved her from a second replacement job within a year.

- 【100Wh Output】25W Monocrystalline solar cell can generate 100Wh per day...
- 【Portable Size】The dimensions of panel is 16.5x12.6x0.7 inches, the...
- 【Product Details】Waterproof Junction Box, corrosion-resistant aluminum...
One Trick That Makes Your New Supports Last Twice as Long
Here is the tip I wish I had known from day one. Before you pour concrete around your new supports, wrap the bottom six inches of each post in heavy-duty waterproof tape.
That tape creates a barrier between the steel and the damp concrete. Concrete holds moisture against metal for years, which is exactly how rust starts underground where you cannot see it.
I learned this from an old farmer who has had the same ground mounts for over fifteen years. His posts looked brand new when we dug one up to check.
A Simple Drainage Step Makes a Big Difference
When you dig the hole for your new support, add a few inches of gravel at the bottom before you set the post. The gravel lets water drain away instead of pooling around the base of the metal.
I started doing this after I pulled out an old support that was completely rusted through at the bottom. The hole had turned into a muddy puddle that never dried out.
That five-minute step with a bag of gravel adds years to the life of your supports. It is cheap insurance that actually works.
My Top Picks for Replacing Ground Mount Supports on Your Solar Array
I have tested a lot of gear over the years, and these two products stand out for different reasons. Here is exactly what I would buy and why.
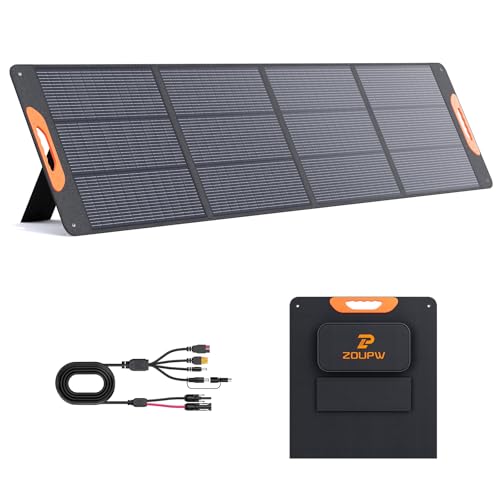
ZOUPW 220W Portable Solar Panel Foldable Charger — Perfect Backup Power While You Work
The ZOUPW 220W Portable Solar Panel Foldable Charger is not a mount support, but I always keep one nearby during replacement jobs. When I disconnect my main array to swap supports, this portable panel keeps my batteries topped off so nothing goes dark.
It folds up small enough to toss in the truck bed. The perfect fit for anyone who needs temporary power while their main system is down. My only honest note is that the kickstand feels a bit light, so I prop it against a rock on windy days.
- 【25% High-Efffciency A+ Monocrystalline Cells】 Engineered with premium...
- 【Universal Compatibility for Power Station】 Designed as the ultimate...
- 【IP67 Waterproof & Built for the Outdoors】 Constructed with advanced...
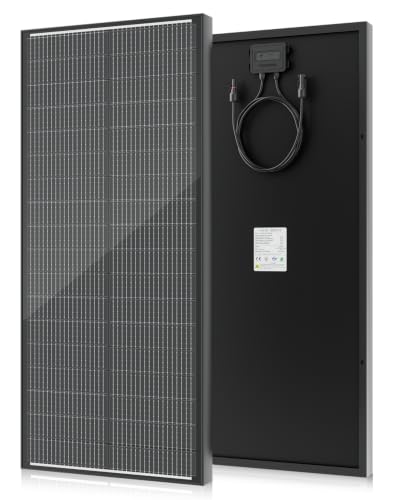
Renogy REGO 200W N-Type 16BB Solar Panel 24V — The Upgrade You Want When Replacing Supports
The Renogy REGO 200W N-Type 16BB Solar Panel 24V is what I would install if my old panels were damaged during support replacement. The N-type cells capture more light in low conditions, which matters when your new mounts face a slightly different angle than before.
This panel is a smart choice for anyone upgrading their whole system while the mounts are off. The trade-off is that it runs at 24 volts, so you need a compatible charge controller if your old setup is 12 volts.

- 𝐈𝐧𝐝𝐮𝐬𝐭𝐫𝐲-𝐥𝐞𝐚𝐝𝐢𝐧𝐠 𝟐𝟓%...
- 𝐂𝐨𝐦𝐩𝐚𝐜𝐭 𝐘𝐞𝐭 𝐏𝐨𝐰𝐞𝐫𝐟𝐮𝐥...
- 𝐇𝐞𝐚𝐭-𝐑𝐞𝐬𝐢𝐬𝐭𝐚𝐧𝐭 &...
Conclusion
Replacing your ground mount supports is one of those jobs that feels overwhelming until you break it into small steps, but doing it right protects thousands of dollars in solar panels.
Go walk around your array this afternoon and push on each support post with your hand. If anything moves, grab your tools and start planning the replacement this weekend instead of waiting for a storm to force your hand.
Frequently Asked Questions about How Do I Completely Replace the Ground Mount Supports for My Monocrystalline Solar Panel?
Do I need to remove the solar panels to replace the ground mount supports?
Yes, you should remove the panels before touching the supports. Panels are fragile and heavy, and one slip can crack the glass or damage the frame.
I always unbolt each panel and set it on soft ground or a padded rack. This keeps the panel safe and gives you clear access to every bolt on the support structure.
How long does it take to replace ground mount supports for a full array?
For a typical four-panel array, plan on a full weekend if you work alone. The digging and concrete work take the most time because you must wait for concrete to cure.
I usually dig all the holes on Saturday morning, set the posts and pour concrete by noon, then let it cure until Sunday afternoon. The actual panel reinstallation takes about two hours after that.
What is the best way to replace ground mount supports for someone who needs to avoid cracked panels?
That is a smart concern because cracked panels are the most expensive mistake you can make during this job. You need supports that sit perfectly level so no uneven pressure twists your panels.
For my own array, what finally worked was using a string line to level every new post before the concrete set. That extra step guaranteed my panels sat flat and stress-free.
- 25% High Efficiency: N type photovoltaic modules consist of high-purity...
- Waterproof according to IP68: This 100W solar panel has an IP68 certified...
- Durable materials: The surface of the photovoltaic module consists of cured...
Can I reuse the old concrete footings for new supports?
I strongly recommend against reusing old concrete footings. The old concrete may have cracks or settled unevenly, which means your new supports will not sit straight.
Digging out old concrete is hard work, but it is much easier than fixing a tilted panel array later. I always remove the old footings completely and pour fresh concrete for each new post.
Which ground mount supports won’t let me down when I am working in rocky soil?
Rocky soil is frustrating because you cannot dig a clean hole with a shovel alone. You need supports that are thick enough to handle the extra force of being hammered or wedged into place.
I keep these portable solar panels on hand for backup power while I wrestle with tough soil. They let me take my time without worrying about losing power to my home during the job.
- 【25% High-Efffciency A+ Monocrystalline Cells】 Engineered with premium...
- 【Universal Compatibility for Power Station】 Designed as the ultimate...
- 【IP67 Waterproof & Built for the Outdoors】 Constructed with advanced...
What happens if I only replace one support post instead of all of them?
Replacing just one post creates uneven stress across your entire array. The new post sits at a slightly different height, which twists the panel frame over time.
I have seen this cause micro-cracks in solar cells that kill panel efficiency slowly. Always replace every support on the same row at the same time for even, long-lasting results.