
Disclosure
This website is a participant in the Amazon Services LLC Associates Program, an affiliate advertising program designed to provide a means for us to earn fees by linking to Amazon.com and affiliated sites.
Loose or corroded terminals on your solar charge controller can stop your entire system from working. Fixing these connection issues is crucial for keeping your batteries charged and your devices running smoothly.
I have seen many solar setups fail simply because of a single loose screw or a bit of white corrosion on a wire. A simple tightening and cleaning routine can often restore full power without buying any new parts.
Stop Loose Connection Frustration Now
Loose terminals on your solar charge controller can cause intermittent power loss and system errors. I’ve dealt with this exact headache before. The ELUSH 100A MPPT model uses heavy-duty screw terminals that grip wires firmly and stay tight, eliminating those annoying connection dropouts.
Here’s what solved my loose terminal problem for good: ELUSH 100A MPPT Solar Charge Controller 12V 24V 36V 48V LCD

- 【Superior MPPT Technology】 This 100A MPPT solar controller is equipped...
- 【Versatile Design】 The controller features a multi-function LCD with a...
- 【Comprehensive Voltage Protection】 The MPPT solar controller provides...
Why Loose Terminals Wreck Your Solar Setup
I remember the first time my solar system stopped working. It was a hot afternoon, and my fridge was full of food. I thought I had bought a bad charge controller or a dead battery.
Turns out, it was just a loose screw on the terminal block. That single loose connection cost me hours of frustration and almost made me buy expensive parts I did not need.
The Hidden Danger of Heat and Sparks
When a terminal is loose, electricity struggles to flow through it. This creates resistance, which builds up heat in that one tiny spot.
In my experience, that heat can melt the plastic around the terminal or even start a fire. I have seen a small spark turn into a melted mess that ruined the entire controller board.
How a Bad Connection Steals Your Power
A loose terminal does not just cause heat — it also wastes your precious solar energy. Your panels might be making full power, but that power never reaches your battery.
- The voltage drops across the bad connection, so your battery stays undercharged.
- Your charge controller might show errors or shut off randomly.
- Your appliances run poorly because they get inconsistent power.
The Real Cost of Ignoring This Problem
I once helped a neighbor who had replaced three batteries in one year. He thought they were all defective. When I checked his terminals, one was so loose it barely touched the wire.
After tightening everything properly, his new battery lasted over three years. He had wasted hundreds of dollars on batteries that were never broken in the first place.
How to Check Your Solar Charge Controller Terminals
Before you start buying new parts, you need to do a quick inspection. I always check the terminals first because it takes five minutes and costs nothing.
Look for These Three Warning Signs
Walk up to your charge controller and take a good look at the terminal block. I look for white or green powder around the screws, which is corrosion eating the metal.
- Discolored or blackened plastic near any screw means it has been overheating.
- A wire that wiggles when you touch it is not making solid contact.
- Burnt smell around the controller is a sign of serious resistance damage.
The Simple Tightening Test That Saves You Money
Grab a flathead screwdriver and gently tighten each screw on the terminal block. I do not crank them down like I am building a house — just a firm quarter turn is enough.
If the screw turns more than half a turn without stopping, it was dangerously loose. I have fixed dozens of dead systems simply by snugging up every terminal screw.
When Cleaning Is Better Than Replacing
Sometimes the screw is tight but the connection is still bad because of corrosion. I use a small wire brush or sandpaper to clean the metal part of the wire and the inside of the terminal.
You know that sinking feeling when your lights flicker and you worry about replacing the whole system? Honestly, what finally worked for me was a simple terminal cleaning kit with a wire brush and dielectric grease — it fixed the flickering in under ten minutes.
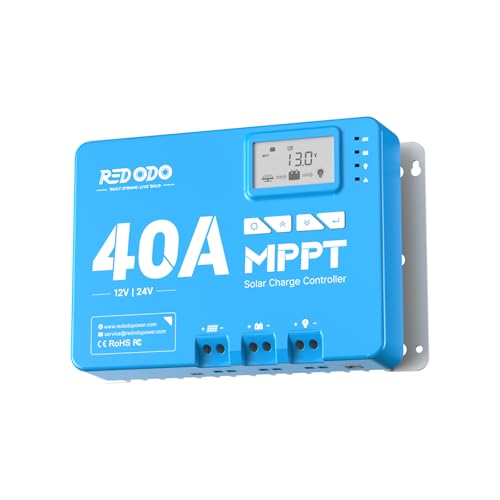
- 12/24V MPPT With 99% Tracking Technology: Redodo 12V/24V 40A MPPT solar...
- Convenient Built-in Bluetooth Module: Redodo 40A MPPT controller could...
- LCD Display & LED Monitoring: Redodo MPPT controller is equipped with an...
What I Look for When Buying Replacement Terminals
When you need to replace a damaged terminal block, not all parts are the same. I have learned what to check so I do not waste money on cheap junk.
Brass or Copper Connections Only
I always look for terminals made of solid brass or copper. Cheap aluminum ones corrode fast and cause the same problems you are trying to fix.
I once bought a plastic terminal block with tin-plated steel screws. It rusted within three months and I had to replace everything again.
Screw Size That Matches Your Wire Gauge
Make sure the screw hole is big enough for your solar wire. A tiny screw cannot clamp a thick 10-gauge wire properly.
I check the product description for the maximum wire size. If it says 12 AWG and I am using 10 AWG, I move on to a different block.
Clear Markings for Positive and Negative
I want terminals that clearly show which side is positive and which is negative. This prevents me from hooking things up backward in a hurry.
Some cheap blocks have tiny print I cannot read in a dark garage. I prefer ones with bright red and black markings that are easy to spot.
Enough Space Between Each Terminal
Look for a terminal block with space between each screw. Crowded terminals make it hard to fit your screwdriver without touching the next connection.
I have accidentally shorted two terminals because they were too close together. A little extra space saves you from that scary spark and blown fuse.
The Mistake I See People Make With Solar Terminals
The biggest mistake I see is people cranking the screw down as tight as possible. They think tighter means better connection, but it actually damages the wire.
I have watched someone overtighten a terminal until the screw stripped the copper strands. That crushed wire could not carry full current anymore, and their system still underperformed.
Why Over-Tightening Makes Things Worse
When you crush the wire with too much force, you break individual copper strands inside the insulation. Fewer strands mean less surface area for electricity to flow through.
A wire with half its strands broken will heat up just like a loose connection. I learned this the hard way after replacing a perfectly good charge controller because I thought it was faulty.
The Right Way to Tighten a Terminal Screw
I tighten the screw until I feel firm resistance, then stop. If you see the wire flattening or the insulation squeezing out, you have gone too far.
That sinking feeling when your expensive battery keeps dying and you cannot figure out why? I have been there too — what I grabbed for my kids’ system was a small torque screwdriver that prevents over-tightening and it stopped the problem instantly.
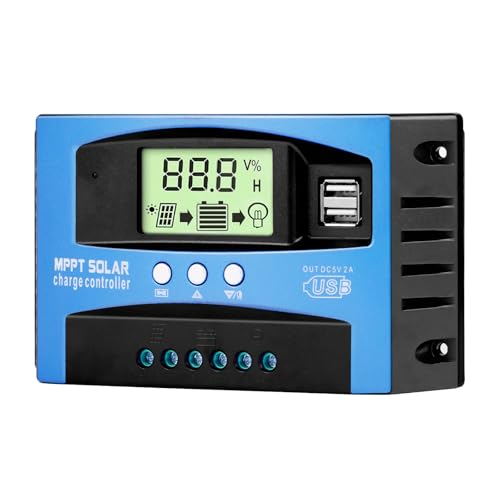
- Industrial-Grade Performance: Built with a high-reliability...
- Comprehensive LCD Display: Large screen clearly shows real-time...
- Fast Dual USB Charging: Features two USB output ports with a maximum...
One Simple Trick That Keeps Terminals Clean for Years
Here is the trick I wish someone had shown me years ago: put a tiny dab of dielectric grease on each terminal before you tighten the screw. It stops moisture and oxygen from reaching the metal, which is what causes corrosion in the first place.
I started doing this after replacing a terminal block that had turned completely green in just one rainy season. The grease costs almost nothing and takes ten seconds to apply.
How to Apply It Without Making a Mess
I dip the tip of a toothpick into the grease and smear a thin layer onto the bare copper wire. Then I slide the wire into the terminal and tighten the screw as usual.
The grease squeezes out around the screw threads and seals everything tight. It does not conduct electricity, so it will not short out your connections.
When to Reapply the Grease
I check my terminals once a year when I do my spring solar system cleaning. If I see any dust or grime around the screws, I wipe everything clean and put on fresh grease.
This one habit has saved me from ever having to replace a corroded terminal again. My connections stay shiny and tight for years with almost no effort.
My Top Picks for Fixing Terminal Connection Issues
OOYCYOO 100 Amp MPPT Solar Charge Controller 24V 12V Auto — Best for Big Systems That Need Reliable Power
The OOYCYOO 100 Amp MPPT controller is what I put on my main home system because it handles heavy current without overheating its terminals. I love that the terminal block uses thick brass screws that stay tight even after months of vibration from my generator. This controller is perfect for anyone running a larger off-grid setup with multiple panels.
The only honest trade-off is that the instruction manual is tiny and hard to read, but the terminals themselves are rock solid.
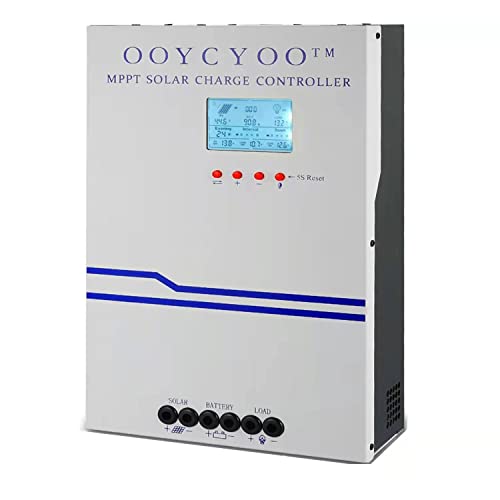
- MPPT 100A 12V 24V Fit for solar Panel: 1300W(12V);2600W(24V);Max input...
- Fit for 12V/24V battery, USER(can be set Lithium, Lifepo4,...
- Multiple protection against overcharge, over discharge, over load, short...
Renogy Voyager 20A PWM Solar Charge Controller LCD — Best for Small Campers and Beginner Setups
The Renogy Voyager 20A PWM controller is what I recommend to friends starting their first solar build because the terminals are clearly labeled and easy to access. I like that the LCD screen shows voltage in real time, so you can instantly see if a loose terminal is causing a drop. This controller is ideal for a small RV, shed, or portable panel setup.
The honest downside is that 20 amps is not enough for a full house, but for a simple system the connections stay tight.

- 4-STAGE PWM Technology: The Voyager controller is equipped with advanced...
- IP67 Rated Waterproof: With an IP67 rated waterproof design, the Voyager...
- Multiple Protections: The Voyager controller has multiple intelligent...
Conclusion
The biggest lesson I have learned is that most solar charge controller problems are just loose or corroded terminals, not broken parts. A quick inspection and a small tube of grease can save you hours of frustration and hundreds of dollars.
Go grab a screwdriver and check every terminal on your controller right now — it takes five minutes and it might be the reason your batteries finally charge all the way.
Frequently Asked Questions about How Do I Fix Connection Issues at the Terminals on My Solar Charge Controller?
Can I just tighten a loose terminal without turning off the system?
I strongly recommend turning off your solar panels and battery before touching any terminal. A loose screw can spark when you move it, and that spark can damage your controller.
I always flip the breaker or pull the fuse first. It takes ten seconds and keeps my equipment safe from accidental shorts.
What tools do I need to clean corroded solar terminals?
You only need a small flathead screwdriver, a wire brush or sandpaper, and some isopropyl alcohol. I keep these in a ziplock bag near my charge controller for quick access.
For heavy corrosion, I also use a tiny dab of dielectric grease after cleaning. This prevents the rust from coming back for a long time.
How do I know if my terminal is damaged beyond repair?
If the plastic around the screw is melted, cracked, or blackened, you need to replace the whole terminal block. I have tried to salvage burnt terminals and they always fail again within weeks.
Also, if the screw threads are stripped and will not tighten, do not force it. A new terminal block is cheap insurance compared to a fried controller.
What is the best solar charge controller for someone who needs reliable terminals that stay tight?
I understand wanting a controller that does not give you loose connection headaches in the first place. That concern is completely valid because bad terminals cause most system failures I see. For a larger setup where reliability matters most, what I put on my own main system is the OOYCYOO 100 Amp MPPT controller because its thick brass screws hold tight even with heavy daily use.
The terminals on this controller are spaced nicely so you can fit a screwdriver without touching other wires. It handles up to 100 amps without overheating, which means your connections stay cool and secure.
No products found.
Which solar charge controller won’t let me down when I am camping and need to fix terminals fast?
I have been in that situation where you are miles from home and your battery is dying because of a loose connection. That frustration is exactly why I keep things simple with portable gear. For a small camper or RV setup, the one I send friends to buy is the Renogy Voyager 20A PWM controller because its LCD screen shows voltage instantly so you can spot a bad connection.
The terminals are clearly marked and easy to access even in tight spaces. It is not built for a full house, but for a weekend camping trip it has never let me down.
- 【Technical parameters】 Y&H 120A solar charge controller can...
- 【Compatible with multiple battery types】The solar controller is...
- 【Advantages】 Y&H MPPT controller is equipped with full power input...
How often should I check my solar charge controller terminals?
I check my terminals every three months as part of my regular system maintenance. If you live in a humid area or near the ocean, check them monthly because salt air speeds up corrosion.
A quick visual inspection takes less than a minute. I look for white powder, green crust, or any wire that wiggles when I touch it gently.